
Can you dry age deer at home? Yes, you absolutely can dry age deer at home, and this guide will walk you through every step to do it safely and effectively, transforming your venison into a delicacy with enhanced flavor and tenderness.
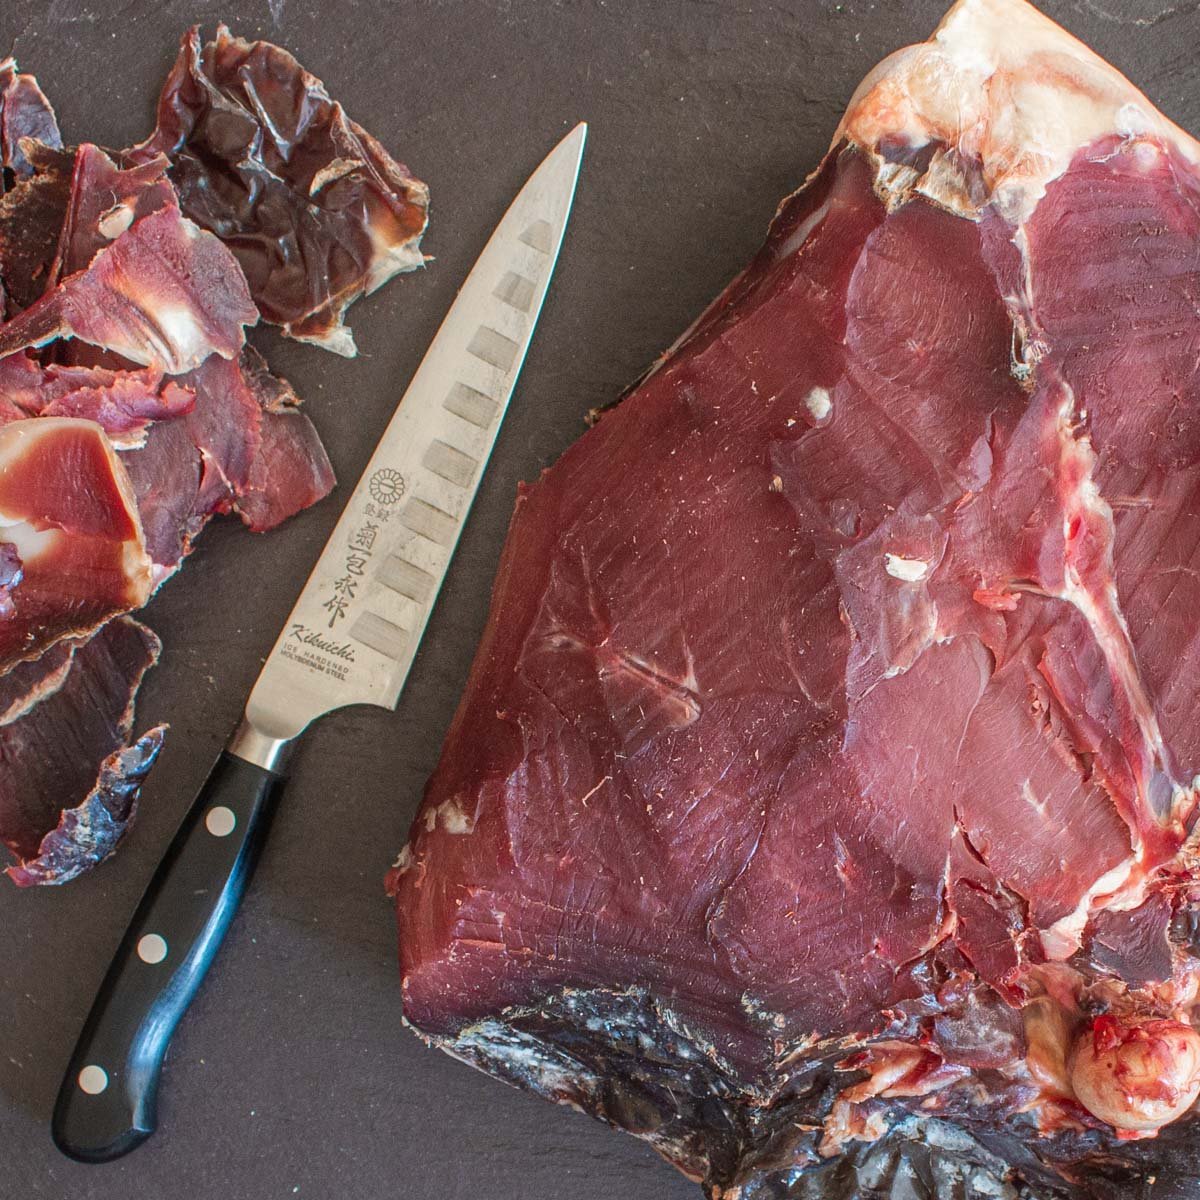
Image Source: foragerchef.com
Deciphering the Art of Dry Aging Venison
Dry aging is a time-honored technique that transforms ordinary meat into an extraordinary culinary experience. It’s a process where large cuts of meat are stored in a controlled environment for an extended period. During this time, several magical things happen:
- Moisture Loss: Water evaporates from the meat, concentrating its natural flavors.
- Enzymatic Breakdown: Natural enzymes within the meat work to break down tough connective tissues, leading to incredible tenderness.
- Flavor Development: The dry aging process allows for the development of complex, nutty, and sometimes even cheesy flavors that are distinct from any other cooking method.
While often associated with beef, the principles of dry aging venison are similar, albeit with a few crucial differences due to the nature of wild game. This guide will equip you with the knowledge to embark on your home meat aging journey with confidence.
The Benefits of Dry Aging Venison
The rewards of properly dry-aged venison are significant and well worth the effort:
- Intensified Flavor: The most noticeable benefit is the concentrated, rich, and complex flavor profile that develops. Expect nutty, earthy, and sometimes even umami-rich notes that are simply not present in fresh venison.
- Superior Tenderness: The enzymatic action during the aging process breaks down muscle fibers and connective tissues. This results in venison that is remarkably tender, melting in your mouth with every bite.
- Unique Texture: As moisture is lost, the meat becomes denser and firmer, offering a satisfying chew that complements the developed flavors.
- Culinary Prestige: Dry-aged venison elevates any meal, turning a simple venison steak into a gourmet experience.
Essential Equipment for Home Meat Aging
To successfully dry age deer at home, you need specific equipment to maintain a stable and safe environment. This isn’t something you can do in your regular refrigerator without careful consideration.
Your Dedicated Deer Aging Fridge
The cornerstone of safe dry aging is a dedicated appliance. A deer aging fridge (often referred to as a secondary refrigerator or a specialized aging cooler) is ideal. Here’s why:
- Temperature Control: You need precise control over the temperature. A secondary fridge allows you to set and maintain a consistent temperature without affecting the other items in your main refrigerator.
- Odor Isolation: Wild game can have a distinct aroma. Aging it in a separate unit prevents these odors from permeating other foods.
- Space: Large cuts of venison require ample space for air circulation.
Creating a Dry Aging Chamber
While a dedicated fridge is best, you can also adapt a larger refrigerator or a walk-in cooler to function as a dry aging chamber. The key is to control the environment within this space.
- Purpose-Built Aging Units: These are commercially available and designed specifically for dry aging. They often come with built-in humidity and temperature controls, along with UV lighting to inhibit bacterial growth.
- Modified Refrigerators: With careful attention to temperature and humidity, a standard refrigerator can be used. You’ll need to manage the humidity actively.
The Right Tools for the Job
Beyond the aging environment, a few other tools are essential:
- Meat Hooks/Trays: Depending on your method, you’ll need strong meat hooks if you plan to hang the venison, or stainless steel trays to support the cuts on shelves.
- Digital Thermometer/Hygrometer: Crucial for monitoring both temperature and humidity levels within your aging chamber.
- High-Quality Knives: You’ll need sharp knives for trimming the pellicle (the dried outer layer) after aging.
- Vacuum Sealer (Optional but Recommended): Useful for storing aged venison before cooking or for aging smaller cuts in a controlled manner.
Setting the Perfect Environment: Temperature and Humidity
The success of dry aging hinges on maintaining the correct temperature for aging venison and precise humidity levels. These are non-negotiable for safety and flavor development.
The Ideal Temperature for Aging Venison
The consensus for dry aging large cuts of beef and venison is a consistent temperature between 34°F and 38°F (1°C to 3°C).
- Why This Range? This temperature range is cold enough to significantly slow down the growth of spoilage bacteria but warm enough to allow beneficial enzymatic activity to occur.
- Consistency is Key: Fluctuations in temperature can lead to uneven aging and increase the risk of spoilage. Use a reliable thermometer to monitor your aging fridge.
Mastering Humidity for Dry Aging
Humidity plays a critical role in the dry aging process. The goal is to create an environment where moisture can slowly evaporate from the meat’s surface, concentrating flavor, without drying it out too quickly or allowing mold to grow uncontrollably. The ideal humidity for dry aging is typically between 75% and 85%.
- Too Low Humidity: If the humidity is too low, the meat will dry out excessively, resulting in a much larger trim loss and potentially tough meat.
- Too High Humidity: High humidity encourages the growth of undesirable bacteria and molds, which can spoil the meat and make it unsafe to consume.
- Humidity Control Methods:
- Humidifier/Dehumidifier: For sophisticated setups, you can use small, dedicated humidifiers or dehumidifiers to maintain the target range.
- Bowls of Water/Salt: A simple method involves placing bowls of water (for higher humidity) or rock salt (which absorbs moisture) in the aging chamber. You’ll need to monitor and adjust these.
- Ventilation: Proper airflow is crucial to prevent stagnant pockets of moisture. Ensure your aging fridge has adequate ventilation or use a small fan to circulate air.
The Dry Aging Process: Step-by-Step
Dry aging venison at home requires patience and attention to detail. Follow these steps to ensure a safe and successful outcome.
Step 1: Selecting Your Venison Cuts
Not all cuts of venison are ideal for dry aging. The best cuts are large, primal cuts with a good amount of fat and connective tissue.
- Ideal Cuts:
- Backstraps (Loin): While often enjoyed fresh, a whole backstrap can be dry-aged. However, due to its leanness, the fat cap is crucial for protection and flavor.
- Hindquarters (Rump, Sirloin): These large muscles benefit greatly from dry aging.
- Front Shoulders: Can also be aged, but they tend to be tougher and may require longer aging times.
- What to Avoid: Smaller, thinner cuts like steaks or roasts from the mid-section are generally not suitable for traditional dry aging as they lack sufficient fat and surface area to withstand moisture loss and develop the characteristic pellicle.
Step 2: Preparing the Venison for Aging
Proper preparation is vital before placing your venison in the aging environment.
- Cleanliness is Paramount: Ensure all surfaces are impeccably clean. Wash your hands thoroughly, use clean cutting boards, and sanitize all utensils and equipment.
- Trimming (Minimal): Remove any damaged or bruised meat. However, avoid excessive trimming, especially of the fat cap. The fat acts as a protective layer, preventing the meat from drying out too quickly and contributing to flavor.
- Whole vs. Individual Cuts: For traditional dry aging, aging large primal cuts or sub-primal cuts (like a whole hindquarter) is best. You can trim these down into individual roasts or steaks after the aging process.
- No Vacuum Sealing (for Traditional Dry Aging): For traditional dry aging, the meat needs to be exposed to the air. Do not vacuum seal the meat before placing it in the aging fridge.
Step 3: Placing the Venison in the Aging Fridge
Now it’s time to introduce your venison to its controlled environment.
- Hanging Method: If you have the setup, hanging the primal cut from a sturdy meat hook allows for excellent air circulation around all sides of the meat. Ensure the hook is securely attached and the meat is well-balanced.
- Tray Method: If you’re using shelves, place the venison on a stainless steel tray or a wire rack set inside a tray. This allows air to circulate underneath and catches any drips. Rotate the meat every few days to ensure even aging.
- Spacing: Ensure there is sufficient space between cuts (if aging multiple pieces) and between the meat and the walls of the fridge to allow for consistent airflow.
Step 4: The Waiting Game: How Long to Dry Age Deer
This is where patience is truly rewarded. The duration of dry aging depends on several factors, including the cut of meat, the fat content, and your desired flavor profile. Generally, how long to dry age deer can range from 7 to 45 days, sometimes even longer.
- Short-Term Aging (7-14 days): This will result in a noticeable increase in tenderness and a subtle flavor enhancement. It’s a good starting point for those new to dry aging venison.
- Medium-Term Aging (14-28 days): You’ll experience a more pronounced development of nutty and savory flavors, along with significant tenderness.
- Long-Term Aging (28-45+ days): This is where the most intense flavors and unique characteristics emerge. You might notice deeper, more complex, almost cheese-like notes. However, longer aging also means more trim loss and a higher risk if environmental controls aren’t perfect.
Table 1: Recommended Dry Aging Times for Venison
| Aging Period (Days) | Expected Results | Considerations |
|---|---|---|
| 7-14 | Improved tenderness, subtle flavor enhancement, less trim loss | Good for beginners, less aggressive flavor development. |
| 14-28 | Significant tenderness, complex nutty/savory flavors, moderate trim loss | Balanced approach, noticeable difference in flavor and texture. |
| 28-45+ | Intense, complex flavors, extreme tenderness, significant trim loss, risk of spoilage | For experienced aging enthusiasts, requires meticulous control, potential for unique flavor profiles. |
Step 5: Trimming the Pellicle
After the aging period, your venison will have developed a hard, dark outer layer called the pellicle. This layer is essentially dried-out meat and may have some mold growth (which is often desirable in controlled dry aging, but needs to be managed).
- Assess the Pellicle: The pellicle should be dry and firm, not slimy or overly moldy with off-putting colors (e.g., vibrant green or black mold). A healthy pellicle will be dark brown to black.
- Trim Generously: Using a sharp knife, carefully trim away the entire pellicle from all surfaces of the meat. You want to expose the fresh, vibrant red meat underneath. Be prepared for a significant amount of trim loss, which is normal.
- Reshape and Portion: Once trimmed, you can reshape the venison and cut it into desired roasts or steaks.
Step 6: Cooking Your Dry-Aged Venison
The cooking process for dry-aged venison is similar to fresh venison, but the intense flavor means you might want to use fewer seasonings to let the meat’s natural qualities shine.
- Sear First: A hot sear in a cast-iron skillet or on a grill creates a beautiful crust.
- Roast or Grill: Continue cooking to your preferred internal temperature. Venison is best served medium-rare to medium.
- Rest is Crucial: Always allow your dry-aged venison to rest for at least 10-15 minutes after cooking before slicing. This allows the juices to redistribute, resulting in more tender and flavorful meat.
Utilizing Venison Dry Aging Bags
For those who don’t have a dedicated deer aging fridge or a large space, venison dry aging bags offer an excellent alternative for aging wild game at home. These specialized bags are designed to allow moisture to escape while preventing spoilage and excessive drying.
How Venison Dry Aging Bags Work
These bags are made of a special membrane that is permeable to moisture and gases but impermeable to bacteria and contaminants. When you seal a cut of venison inside, the controlled environment allows the meat to age similarly to traditional dry aging, but with a much lower risk of spoilage and less trim loss.
- Benefits of Using Bags:
- Simplicity: Easier to manage than traditional methods.
- Reduced Trim Loss: The bags protect the meat, minimizing the formation of a thick pellicle.
- Flexibility: Can be used in a regular refrigerator (though a dedicated fridge is still preferable for odor control).
- Cost-Effective: Often less expensive than investing in specialized aging equipment.
Steps for Using Venison Dry Aging Bags
- Select Your Cuts: Similar to traditional methods, larger primal cuts or sub-primal cuts are best.
- Prepare the Meat: Trim away any silver skin or excess fat, but leave a decent fat cap if possible. Ensure the meat is clean.
- Bag the Venison: Carefully place the venison into the dry aging bag.
- Vacuum Seal (Optional but Recommended): While some bags are designed to be sealed with tape, using a vacuum sealer to remove excess air from the bag generally creates a tighter seal and better contact with the meat. Follow the manufacturer’s instructions for your specific bags.
- Age in the Refrigerator: Place the bagged venison in your refrigerator. A deer aging fridge is still ideal, but a regular fridge can work.
- Age Duration: Typically, aging in bags can range from 10 to 30 days, depending on the cut and desired flavor. The bags tend to accelerate the process compared to traditional open-air aging, as they create a micro-environment.
- Post-Aging: Once aged, remove the venison from the bag. You may still have a slight pellicle, but it will be much thinner and easier to trim than with traditional methods. Proceed to cooking as usual.
Safety First: Preventing Spoilage and Botulism
When venturing into home meat aging, food safety must be your absolute top priority. Improperly aged meat can harbor harmful bacteria, including Clostridium botulinum, which causes botulism, a potentially fatal illness.
Key Safety Practices
- Maintain Consistent Temperature: Fluctuations are the enemy. Stick to the recommended temperature for aging venison (34-38°F / 1-3°C). Use a reliable thermometer.
- Control Humidity: Aim for 75-85% humidity. Too high encourages spoilage bacteria; too low dries out the meat excessively.
- Good Airflow: Stagnant air can lead to mold and bacterial growth. Ensure your aging chamber is ventilated.
- Cleanliness: Sanitize everything that comes into contact with the meat – your hands, knives, cutting boards, hooks, and trays.
- Visual and Olfactory Inspection: Before cooking, always inspect the meat. It should have a pleasant, slightly nutty aroma. Any signs of slime, off-putting smells (sour, ammonia-like), or fuzzy, discolored mold (beyond the acceptable brown/black pellicle) indicate spoilage. When in doubt, throw it out.
- Trim Appropriately: Thoroughly trim away the pellicle. If you encounter any areas of concern during trimming, cut them away generously.
- Start Small: If you’re new to this, start with shorter aging periods and smaller cuts. Gain experience and build confidence before attempting longer ages or larger pieces.
Frequently Asked Questions About Dry Aging Venison
Q1: Can I dry age venison in my regular refrigerator?
A1: While technically possible, it’s not ideal. Your regular refrigerator fluctuates in temperature more than a dedicated aging fridge and the odors from dry-aged meat can permeate other foods. If you must use a regular fridge, be extra diligent with temperature and humidity control and consider using dry aging bags.
Q2: What kind of mold is okay on dry-aged venison?
A2: A thin layer of white or slightly grayish mold is generally considered safe and even beneficial for flavor development. The outer layer will also form a hard, dry rind called a pellicle, which turns dark brown or black. However, any mold that is fuzzy, green, black, or has an ammonia-like smell indicates spoilage and the meat should be discarded.
Q3: How much trim loss should I expect when dry aging venison?
A3: Trim loss can vary significantly depending on the aging duration and the cut of meat. For traditional open-air aging, expect anywhere from 20% to 40% or even more for longer aging periods, as the pellicle needs to be trimmed away. Using dry aging bags can reduce this trim loss to around 5-15%.
Q4: Can I dry age ground venison or steaks?
A4: No, dry aging is best suited for large, whole primal cuts or sub-primal cuts. The surface area-to-volume ratio of ground meat or individual steaks is too high, leading to excessive drying and spoilage rather than the controlled aging process.
Q5: What are the best seasonings for dry-aged venison?
A5: The beauty of dry-aged venison is its intensified flavor. Often, simple seasonings like salt and freshly cracked black pepper are all you need. Some prefer to add herbs like rosemary or thyme during the cooking process, but avoid overpowering marinades that mask the natural, complex taste of the aged meat.
Conclusion: A Rewarding Culinary Adventure
Dry aging venison at home is a sophisticated culinary pursuit that offers unparalleled rewards in terms of flavor and tenderness. By meticulously controlling the environment – particularly the temperature for aging venison and the humidity for dry aging – and adhering to strict safety protocols, you can transform your venison into a true gourmet delight. Whether you choose traditional open-air aging in a dedicated deer aging fridge or opt for the convenience of venison dry aging bags, the journey of aging wild game is a testament to patience and the pursuit of culinary excellence. Embrace the process, and savor the exceptional taste of perfectly dry-aged venison.