
Yes, you can replace windows in a brick home yourself, but it’s a challenging project that requires careful planning, the right tools, and a good understanding of construction basics.
Replacing windows in a brick home, often referred to as brick house window replacement or replacing windows in brick, is a significant undertaking. Whether you’re aiming for a brick house window upgrade for better energy efficiency, aesthetics, or simply because your old windows are worn out, this DIY guide will walk you through the process. While professional installation offers peace of mind, a successful DIY brick exterior window repair or full replacement can save you money. This comprehensive guide aims to equip you with the knowledge needed for DIY brick window replacement and installing new windows brick.
Image Source: d4c5gb8slvq7w.cloudfront.net
Deciphering the Process: Why Replace Your Windows?
Before diving into the “how-to,” it’s crucial to understand why you might be considering brick house window replacement. Common reasons include:
- Energy Efficiency: Old, leaky windows are a major source of heat loss in winter and heat gain in summer. Replacing them with modern, energy-efficient units can significantly reduce your energy bills.
- Improved Comfort: Drafty windows create cold spots and uneven temperatures within your home. New windows provide better insulation, leading to a more comfortable living environment.
- Enhanced Aesthetics: New windows can dramatically change the look of your brick home, updating its style and curb appeal.
- Reduced Maintenance: Older windows, especially wood ones, can rot, warp, or require frequent painting. Modern vinyl, fiberglass, or aluminum windows often offer low-maintenance solutions.
- Increased Property Value: Upgrading your windows is a sound investment that can boost your home’s resale value.
- Functionality: If your existing windows are difficult to open, close, or operate, replacement offers a solution.
Comprehending the Challenges of Brick Homes
Working with brick presents unique challenges compared to other building materials. Masonry window replacement requires dealing with mortar, potential brick damage, and ensuring a watertight seal against the porous brick surface. Here’s what makes brick house window replacement a bit trickier:
- Mortar Integrity: Mortar can be brittle. Removing old windows requires care to avoid damaging surrounding bricks.
- Brick Veneer: Many brick homes have a brick veneer, meaning the brick is an outer layer, not the structural wall. This impacts how windows are secured.
- Water Management: Proper flashing and sealing are critical to prevent water infiltration, which can cause significant damage to the wall structure behind the brick.
- Weight and Size: Windows can be heavy, and maneuvering them, especially larger ones, requires multiple people and proper lifting techniques.
Planning Your DIY Brick Window Replacement Project
Thorough planning is the cornerstone of a successful DIY project. Rushing this stage can lead to costly mistakes.
Step 1: Measuring for New Windows
Accurate measurements are paramount. Incorrectly sized windows will lead to fitting issues, air leaks, and increased installation complexity.
How to Measure Existing Windows
- Exterior Measurement:
- Measure the width of the window opening from brick edge to brick edge at the top, middle, and bottom. Use the smallest measurement.
- Measure the height of the window opening from brick edge to brick edge on the left, center, and right. Use the smallest measurement.
- Measure the depth of the opening from the exterior brick face to the interior wall.
- Interior Measurement:
- Measure the width of the window sash (the moving part) at the top, middle, and bottom.
- Measure the height of the window sash at the left, center, and right.
- Measure the depth of the window jamb (the frame inside the wall).
Important Note for Brick Homes: When ordering new windows, you’ll typically order by the “nominal size,” which is usually 1/2 inch less than the rough opening measurement (exterior brick-to-brick). For example, if your rough opening is 36 inches wide by 48 inches high, you’ll order a 3648 window. Always confirm with your window supplier.
Step 2: Selecting the Right Windows
The best windows for brick homes offer durability, energy efficiency, and compatibility with the brick exterior. Consider these factors:
- Material:
- Vinyl: Affordable, low maintenance, good energy efficiency. Can expand and contract with temperature changes.
- Fiberglass: Durable, energy-efficient, low maintenance, less expansion/contraction than vinyl. More expensive.
- Wood: Aesthetically pleasing, good insulator, but requires maintenance (painting/staining) and can be susceptible to rot and insects. Often not the best choice for direct contact with exterior brick unless very well protected.
- Aluminum: Durable, low maintenance, but a poor insulator unless thermally broken.
- Energy Efficiency Ratings: Look for the National Fenestration Rating Council (NFRC) label. Key ratings include:
- U-Factor: Measures how well the window prevents heat from escaping (lower is better).
- Solar Heat Gain Coefficient (SHGC): Measures how well the window blocks heat-causing solar radiation (lower is better in hot climates, higher can be beneficial in cold climates for passive solar heating).
- Visible Transmittance (VT): Measures how much visible light the window lets through (higher is better for natural light).
- Air Leakage (AL): Measures how much air passes through the window when closed (lower is better).
- Window Style: Double-hung, casement, slider, picture windows, etc. Choose styles that complement your home’s architecture and offer desired functionality.
- Brick Veneer Window Installation: If you have a brick veneer, the new window will likely sit within the rough opening created by the underlying framing, not directly against the brick itself.
Step 3: Gathering Tools and Materials
Having everything on hand before you start will save time and frustration.
Essential Tools:
- Safety glasses and work gloves
- Pry bar set (various sizes)
- Hammer
- Chisel (cold chisel for mortar, wood chisel for wood trim)
- Putty knife
- Caulking gun
- Measuring tape
- Level (4-foot and torpedo)
- Utility knife
- Caulking remover or scraper
- Drill and drill bits (including masonry bits)
- Screwdrivers (Phillips and flathead)
- Reciprocating saw (Sawzall) with wood and metal blades (optional, for stubborn removals)
- Ladder
- Buckets
- Shop vacuum
- Caulking tool or trowel
- Putty knife for sealant
- Drop cloths or plastic sheeting
Essential Materials:
- New windows (correctly sized)
- Low-expansion spray foam insulation or backer rod and sealant
- Caulking (exterior grade, paintable silicone or polyurethane)
- Shims (wood or composite)
- Fasteners (screws appropriate for your window type and wall construction)
- Flashing tape (window and door flashing tape)
- Mortar mix (if minor brick/mortar repair is needed)
- Brick chisel (if needed for mortar removal)
- Bond breaker tape (for backer rod)
- Primer and paint (if you need to touch up trim)
Step 4: Budgeting for the Project
The cost to replace windows brick homes can vary widely. DIY installation significantly reduces labor costs, but materials can add up.
Estimated Costs (DIY):
| Item | Estimated Cost Range (per window) | Notes |
|---|---|---|
| Windows | $200 – $1,500+ | Varies greatly by material, size, style, and energy efficiency. |
| Insulation/Sealant | $10 – $30 | Spray foam, backer rod, exterior caulk. |
| Flashing Tape | $10 – $20 | Crucial for water protection. |
| Shims & Fasteners | $5 – $15 | Screws, shims, etc. |
| Minor Repair Materials | $10 – $50 | Mortar mix, brick chisel if needed. |
| Tool Rental/Purchase | Varies | If you don’t own essential tools like a reciprocating saw. |
| Total (per window) | $235 – $1,615+ | Does not include labor. Professional installation can double this. |
Factors influencing cost:
* Number of windows being replaced
* Size and type of windows
* Quality of materials chosen
* Need for any structural repairs or extensive masonry work
The Step-by-Step DIY Guide to Replacing Windows in a Brick Home
This guide assumes you are replacing an existing window with a new one of similar size. If you are enlarging or changing window sizes, additional structural considerations will be necessary.
Step 1: Prepare the Work Area
- Interior: Remove any window coverings, blinds, or curtains. Lay drop cloths on the floor and furniture to protect them from dust and debris.
- Exterior: Clear the area around the window. You may need a stable ladder. Ensure the ground is level for ladder safety.
Step 2: Remove the Old Window
This is often the most physically demanding part, especially with older, potentially painted-shut windows.
For Vinyl or Aluminum Clad Windows:
- Remove Sash:
- Double-hung: Most have spring-loaded mechanisms or pins to allow the sashes to be removed. Look for clips or buttons on the sides of the sash channel. Gently lift or tilt the sash out.
- Sliders: Usually, the sash lifts at the bottom and pulls out.
- Cut Sealant: Use a utility knife to carefully cut through any caulk or sealant around the window frame, both inside and out.
- Remove Trim (Interior): If there is interior trim around the window, carefully pry it off with a putty knife or pry bar.
- Locate and Remove Fasteners: Look for screws or nails that secure the window frame to the wall studs. These are often hidden behind trim or caps. Remove them.
- Pry Out the Frame:
- Start at the top corners. Insert a pry bar between the window frame and the rough opening. Gently pry outwards.
- Work your way around the perimeter. You may need a helper to support the window as it loosens.
- Be mindful of the brick. Avoid excessive force that could crack bricks.
- Remove the Window Unit: Once all fasteners are removed and the frame is loosened, carefully pull the entire window unit out of the opening. It might be heavy.
For Older Wood Windows (Often Painted Shut and Nailed Through Brick):
- Pry Open: If the window is painted shut, use a putty knife or thin pry bar to break the paint seal between the sash and the frame.
- Remove Sashes: Similar to vinyl windows, sashes may be removable via tilt-in mechanisms or by cutting the old putty. If heavily painted, you might need to cut the sash from the frame with a reciprocating saw.
- Address Exterior Brick: This is where brick house window replacement gets specific. Older windows might have frames that were nailed directly through the brick or into the mortar joints.
- Locate Nails/Screws: Carefully inspect the exterior frame for any visible fasteners.
- Mortar Removal: If nails are driven into mortar, you might need to use a cold chisel and hammer to carefully chip away a small amount of mortar around the nail head to expose it for removal. Alternatively, you may need to cut off nails with an angle grinder with a cutting wheel (use extreme caution and safety gear).
- Prying Carefully: Use pry bars strategically, leveraging against the brickwork but not applying direct outward force that could dislodge bricks. The goal is to ease the frame out.
- Cut Sealant: Cut any exterior sealant.
- Remove the Frame: Once fasteners are removed, carefully work the frame out of the opening. You may need to cut through old wood that has become brittle or adhered to the mortar.
Step 3: Prepare the Rough Opening
This is a critical step for ensuring a proper fit and a weather-tight seal.
- Clean Out Debris: Use a scraper, putty knife, and shop vacuum to remove all old caulk, sealant, insulation, wood scraps, and debris from the rough opening. Ensure the surfaces are clean and smooth.
- Inspect for Damage: Check the condition of the rough opening framing and the surrounding brick and mortar.
- Mortar Repair: If mortar is crumbling, use a brick chisel to remove loose sections and then repair with a suitable mortar mix. Allow the new mortar to cure properly.
- Wood Repair: If any wood framing (studs, sill plate) is rotten or damaged, cut it out and replace it.
- Check for Level and Plumb: Use your level to ensure the opening is plumb (vertically straight) and level (horizontally straight). Use shims to correct any slight deviations.
- Install Flashing:
- Apply Flashing Tape: This is vital for water management in brick veneer window installation and any masonry window replacement. Apply self-adhering flashing tape to the sill of the rough opening, extending it up the sides. Then, apply it to the jambs and the header. The tape should create a weather-resistant barrier.
- Overlap Properly: Ensure the flashing tape overlaps correctly to shed water away from the window and the wall cavity. The sill flashing should go under the jamb flashing, and the header flashing should go over the jamb flashing.
Step 4: Install the New Window
This requires precision and patience.
- Apply Sealant to the New Window: Apply a continuous bead of exterior-grade sealant (like silicone or polyurethane) to the nailing fin or the back edge of the window frame that will contact the flashing tape. Some manufacturers recommend a specific sealant or backer rod placement.
- Position the Window:
- Carefully lift the new window into the rough opening. This is where a helper is essential.
- Center the window within the opening.
- Check for Level and Plumb:
- Insert shims between the window frame and the rough opening at multiple points (top, bottom, sides).
- Use your level to ensure the window is perfectly plumb and level. The shims distribute the weight and create a snug fit. The goal is to have equal small gaps all around the frame.
- Fasten the Window:
- Brick Veneer: If it’s a brick veneer, the window will likely be secured to the wood framing behind the brick. Drive screws through the window’s nailing fin (or frame if no fin) into the wood studs.
- Masonry: For some direct masonry installations, specific anchors might be used, but this is less common for standard residential windows and often requires specialized knowledge. For most brick homes, you’ll be screwing into the wood bucks or studs.
- Shim and Screw Incrementally: As you drive screws, periodically check that the window remains plumb and level. Don’t overtighten, which can warp the frame. The shims should be snug but not compressed to the point of distorting the frame.
- Integrate Flashing:
- Apply flashing tape over the nailing fins (or frame edges) and down onto the sill flashing.
- Ensure the tape laps correctly to create a continuous barrier. Use a J-roller to ensure good adhesion.
Step 5: Insulate and Seal
Preventing air leaks is crucial for energy efficiency and comfort.
- Insulate the Gap:
- Spray Foam: Use a low-expansion spray foam insulation specifically designed for windows and doors. Apply it in the gap between the window frame and the rough opening. Be careful not to over-expand the foam, which could bow the window frame.
- Backer Rod: Alternatively, insert a foam backer rod into the gap, then seal over it with caulk. The backer rod prevents the caulk from falling into the gap and allows it to form a proper seal.
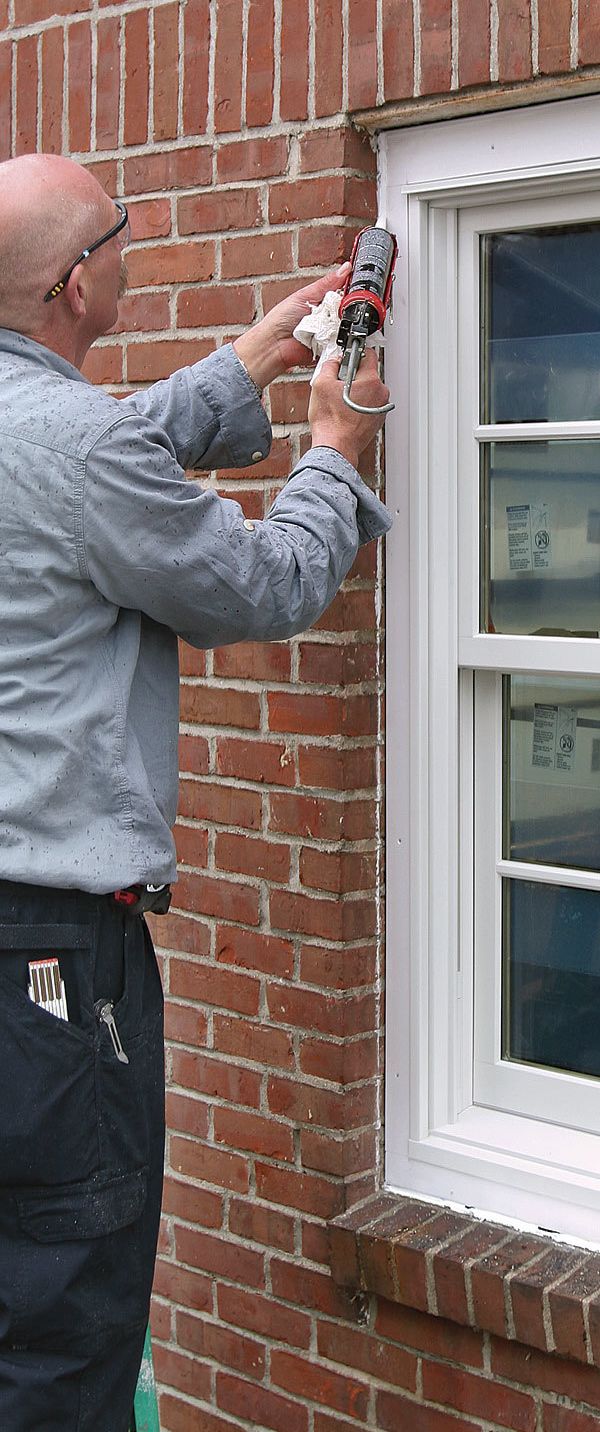
- Seal the Exterior:
- Apply a continuous bead of high-quality exterior-grade caulk around the entire perimeter of the window frame, sealing it to the brick or flashing. This prevents water from entering the gap.
- Smooth the caulk bead with a damp finger or caulking tool for a neat finish.
- Seal the Interior:
- Reinstall any interior trim that was removed.
- Caulk any gaps between the trim and the wall, and between the trim and the new window frame.
- If you did not reinstall trim, caulk the gap between the new window frame and the interior wall surface.
Step 6: Final Touches and Cleanup
- Test the Window: Open and close the new window to ensure it operates smoothly. Check for any binding.
- Clean the Glass: Remove any manufacturer stickers or protective film and clean the glass.
- Cleanup: Remove drop cloths, tools, and debris. Dispose of old windows and materials properly.
Frequently Asked Questions (FAQ)
Q1: How much does it cost to replace windows in a brick house?
The cost to replace windows brick homes can vary significantly, but for DIY installation, you can expect to pay anywhere from $200 to $1,500+ per window, depending on the window’s size, material, and features. Professional installation will add $300 to $800+ per window for labor.
Q2: Can I replace a brick house window with a different size?
Yes, you can, but it’s a much more involved process. If you’re increasing the size, you’ll need to cut into the brickwork and potentially alter the structural framing, which often requires professional help. If you’re decreasing the size, you’ll need to fill in the void with brick and mortar, which is also a specialized skill. For DIY, sticking to the same rough opening size is highly recommended.
Q3: What are the best windows for brick homes?
The best windows for brick homes are typically those made from durable, low-maintenance, and energy-efficient materials like fiberglass or high-quality vinyl. Consider windows with good U-factor and SHGC ratings to optimize energy performance, especially for brick house window upgrade projects.
Q4: Do I need to worry about brick damage during replacement?
Yes, you need to be very careful. Bricks and mortar can be brittle. Use gentle prying techniques and consider using a brick chisel for stubborn fasteners. If you damage any bricks, you’ll need to repair them with mortar or replace the brick if the damage is severe. Proper flashing and sealing are also crucial to prevent water damage to the brick and the wall behind it.
Q5: How long does it take to replace a window in a brick home?
For an experienced DIYer, replacing a single window in a brick home can take anywhere from 2 to 5 hours. For a first-time DIYer, it might take significantly longer, possibly a full day or more per window, especially when factoring in preparation and potential issues.
Q6: What is the most challenging part of replacing windows in brick?
The most challenging aspects typically involve carefully removing the old window without damaging the surrounding brickwork, ensuring a perfectly sealed and weather-tight installation against the masonry, and handling the weight and positioning of new windows. Dealing with old, stubborn paint and sealant also adds difficulty.
Q7: Is it better to DIY or hire a professional for brick house window replacement?
While DIY brick window replacement can save money, hiring a professional is often recommended, especially if you have no prior experience with home renovations or working with masonry. Professionals have the specialized tools, knowledge, and experience to ensure a proper, weather-tight installation, which is critical for the longevity of your home and to avoid costly water damage.
Conclusion: Is DIY Brick Window Replacement for You?
DIY brick window replacement is an achievable project for the determined homeowner with a good set of tools and a willingness to learn. By meticulously planning, measuring, and following these steps, you can successfully upgrade your brick home’s windows, enhancing its comfort, efficiency, and curb appeal. However, always prioritize safety and don’t hesitate to call a professional if you encounter unexpected issues or feel overwhelmed by the complexity of working with masonry. Your brick home deserves a job done right!