
What is garden bed preparation? Garden bed preparation involves getting your soil ready for planting in the spring. It includes cleaning up old plants, adding new soil material, and making sure the soil is healthy and loose. Can I prepare my garden beds in fall instead of spring? Yes, many tasks can be done in the fall, like adding compost, which gives it more time to break down. Who is responsible for garden bed prep? Anyone who wants a successful garden is responsible for preparing their garden beds.
Spring is a time of renewal, and your garden beds are no exception! As the last frost melts away and the sun’s warmth encourages new growth, it’s crucial to give your garden the best possible start. Proper garden bed preparation is the foundation of a thriving garden, ensuring your plants receive the nutrients and conditions they need to flourish. This guide will walk you through every step, from clearing out winter’s remnants to enriching your soil for a bountiful season.
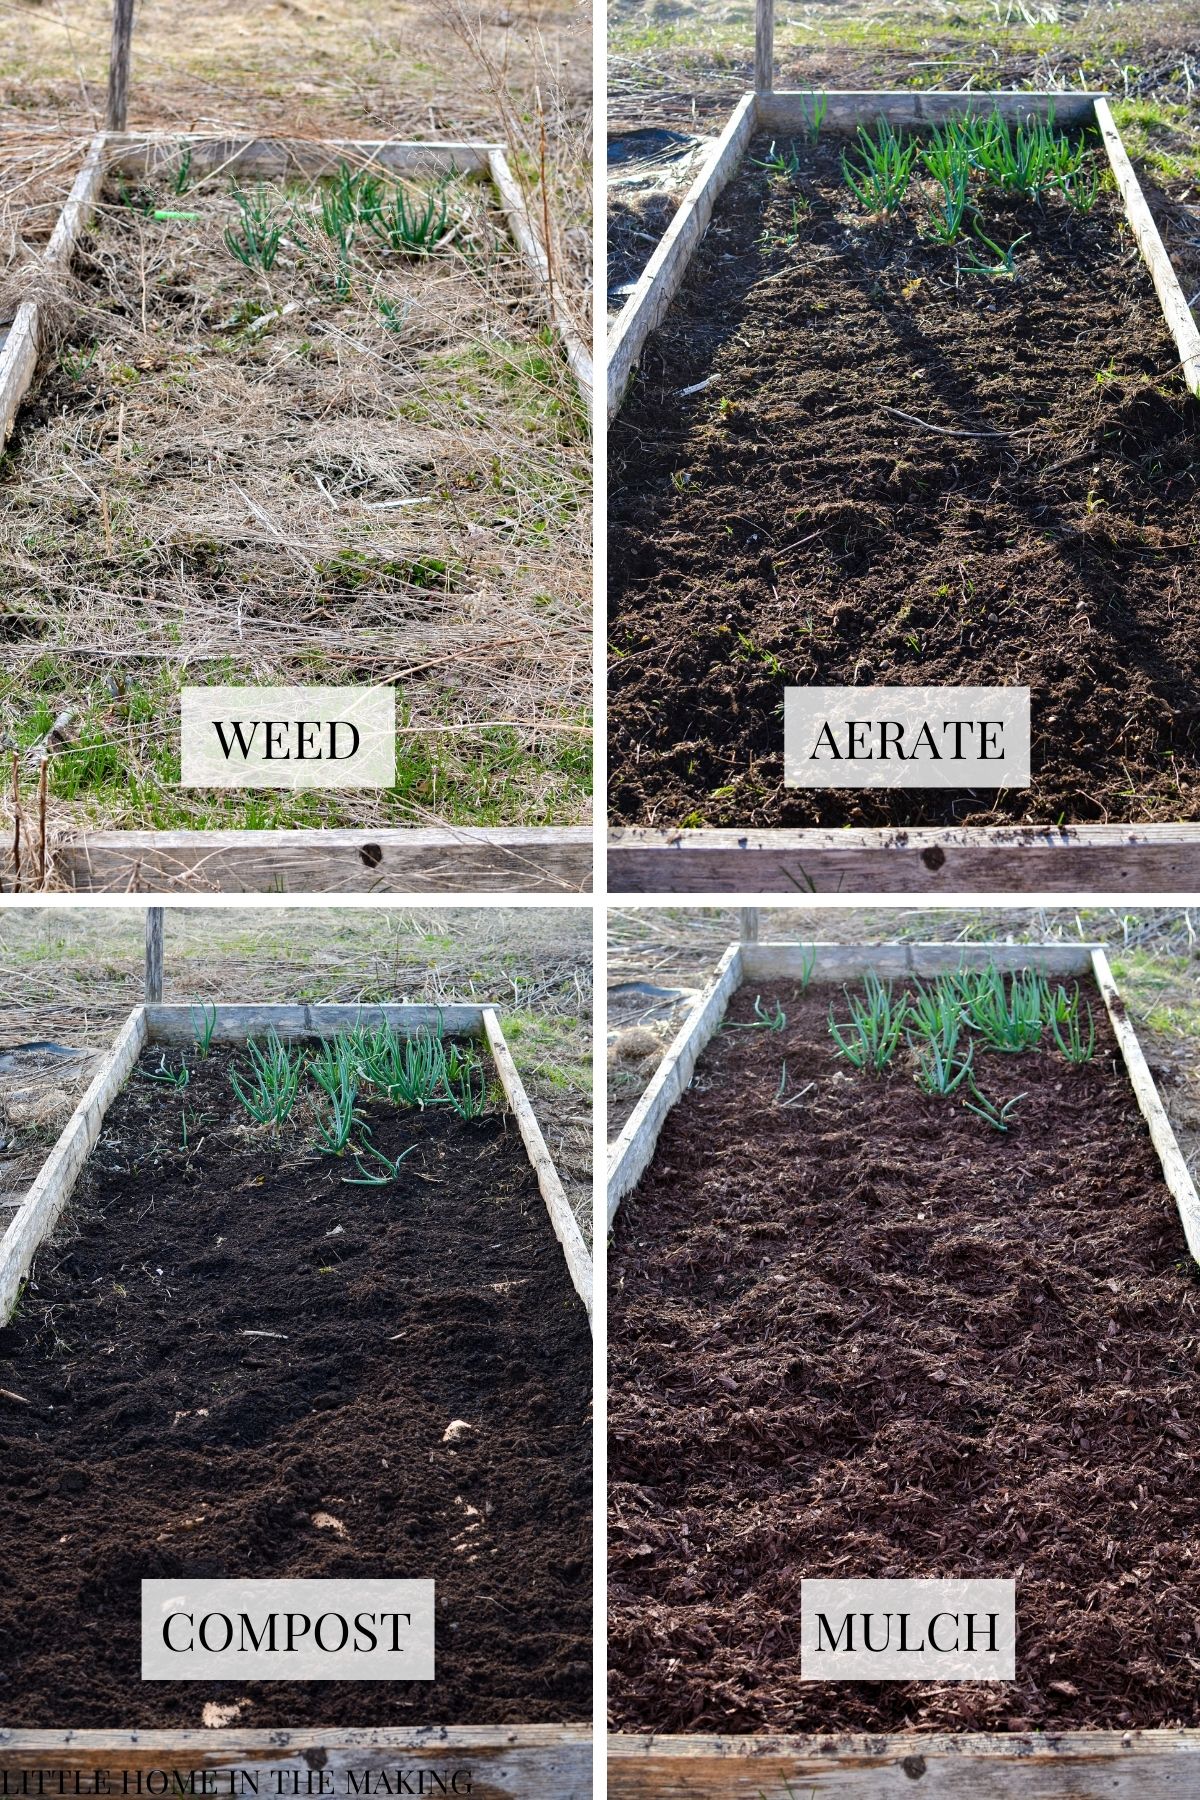
Image Source: www.littlehomeinthemaking.com
Clearing Debris and Winter’s Leftovers
The first step in welcoming spring is saying goodbye to winter. Your garden beds likely hold remnants of the past growing season and the harsh winter months.
Removing Old Plants
- Annuals: Any annual plants that finished their life cycle should be removed. Pull them out by the roots. If they showed no signs of disease, you can add them to your compost pile.
- Perennials: Cut back any dead foliage from perennial plants. Leave a few inches of stem above the ground. This helps protect the plant’s crown from extreme cold and provides habitat for beneficial insects.
- Weeds: Even in winter, weeds can sprout. Tackle any you see now to prevent them from going to seed later.
Clearing Debris
- Fallen Leaves: While leaves can be good for compost, a thick mat on the soil can smother plants and harbor disease. Rake them away from your beds.
- Twigs and Branches: Small twigs and branches should be cleared. Larger ones can be chopped up and added to your compost or used for other garden projects.
- Mulch: If you mulched heavily last fall, you might want to pull some of it back from the immediate base of plants to allow the soil to warm up faster. You can either compost it if it’s clean or leave it on the edges of the bed.
- Litter and Trash: Any stray bits of plastic, old pots, or other litter should be gathered and disposed of properly.
Tackling the Weeds Early
Weeding is an ongoing battle, but starting early in spring gives you a significant advantage.
The Importance of Early Weeding
Weeds compete with your desired plants for sunlight, water, and nutrients. Removing them before they establish deep root systems and go to seed is much easier and prevents a larger problem down the line. Small weeds are also much easier to pull than large, established ones.
Effective Weeding Techniques
- Hand-Pulling: The most direct method. Gently pull weeds, ensuring you get the entire root system. This is most effective when the soil is moist.
- Hoeing: A sharp hoe can slice through small weeds just below the soil surface, especially on a dry, sunny day. The severed weeds will often wither and die.
- Tools: Consider using specialized weeding tools like a dandelion digger or a cultivator for more stubborn weeds with taproots.
Soil Testing: Knowing Your Ground
Before you start adding amendments, it’s wise to know what your soil is working with. A soil test provides vital information about your soil’s pH and nutrient levels.
Why Test Your Soil?
- pH Balance: Soil pH affects how well plants can absorb nutrients. Most vegetables and flowers prefer a slightly acidic to neutral pH (6.0-7.0).
- Nutrient Deficiencies: A test can reveal if your soil is lacking essential nutrients like nitrogen, phosphorus, or potassium, or if there are excesses.
- Targeted Amendments: Armed with this information, you can add the right soil amendment to correct any imbalances, rather than guessing and potentially harming your soil or plants.
How to Test Your Soil
- DIY Kits: You can purchase simple DIY soil testing kits from garden centers or online. These usually involve mixing soil with reagents and comparing the resulting color to a chart.
- Local Extension Office: For more comprehensive and accurate results, send a soil sample to your local agricultural extension office. They can provide detailed reports and recommendations for your specific soil type and region. Collect samples from several spots in your garden bed, mix them, and follow their instructions for submission.
Soil Aeration: Letting Your Soil Breathe
Compact soil can hinder root growth, water penetration, and air circulation. Soil aeration is key to creating a welcoming environment for your plants.
The Benefits of Aerating Soil
- Improved Drainage: Compacted soil doesn’t drain well, leading to waterlogged roots. Aeration creates channels for excess water to escape.
- Better Airflow: Plant roots need oxygen. Aeration allows air to reach deeper into the soil, supporting healthy root development.
- Easier Root Penetration: Loose soil allows roots to grow and spread more easily, anchoring plants and improving their access to water and nutrients.
Methods for Soil Aeration
- Forking: Use a garden fork to push into the soil and gently rock it back and forth. This loosens the soil without completely turning it over.
- Core Aerators: For larger areas or severely compacted soil, a manual or powered core aerator can be used. These machines pull out small plugs of soil, creating immediate channels for air and water.
- Adding Organic Matter: As mentioned in the compost addition section, incorporating organic materials like compost helps improve soil structure over time, naturally aiding in aeration.
Soil Amendment: The Art of Soil Enrichment
Soil amendment is the process of adding materials to improve the physical characteristics, fertility, and biological activity of your soil. This is arguably the most critical step in spring garden bed preparation.
What is Soil Amendment?
Soil amendments are materials that are added to soil to improve its properties. These can include organic matter, minerals, or other substances. They help improve soil structure, water retention, drainage, and nutrient availability.
Key Soil Amendments to Consider
Compost Addition
Compost addition is the gold standard for improving garden soil. Compost is decomposed organic matter that is rich in nutrients and beneficial microorganisms.
- Benefits of Compost:
- Improves soil structure (both sandy and clay soils).
- Increases water-holding capacity.
- Enhances drainage.
- Provides a slow release of essential nutrients.
- Suppresses plant diseases and pests.
- Feeds beneficial soil microbes.
- How to Add Compost: Spread a layer of 2-4 inches of finished compost over the surface of your garden beds. You can then gently work it into the top 4-6 inches of soil.
Other Beneficial Amendments
- Aged Manure: Well-rotted manure is another excellent source of nutrients and organic matter. Ensure it is fully composted, as fresh manure can burn plants.
- Leaf Mold: Decomposed leaves are a fantastic soil conditioner, improving water retention and aeration.
- Peat Moss: While it improves water retention, be mindful of its sustainability. Consider alternatives like coir (coconut fiber).
- Worm Castings: These are incredibly nutrient-rich and packed with beneficial microbes. A little goes a long way.
- Cover Crops: If you planted cover crops like clover or vetch in the fall, they can be tilled into the soil in spring to add nitrogen and organic matter.
Applying Amendments
- Even Distribution: Spread amendments evenly across the surface of your garden beds.
- Incorporation: Gently work the amendments into the top 4-6 inches of soil. Avoid over-tilling, which can damage soil structure and kill beneficial organisms. A garden fork or broadfork is ideal for this.
Adding Nutrients: Feeding Your Plants
While compost provides a broad spectrum of nutrients, specific deficiencies identified through soil testing might require targeted adding nutrients.
Understanding Nutrient Needs
Plants require macronutrients (nitrogen, phosphorus, potassium) and micronutrients (iron, zinc, manganese, etc.) to thrive. Different plants have different needs, and your soil might be deficient in one or more of these.
Nutrient Sources
- Organic Fertilizers: These are derived from natural sources like bone meal (phosphorus), blood meal (nitrogen), or kelp meal (potassium and micronutrients). They release nutrients slowly, feeding your plants over time and improving soil health.
- Compost: As mentioned, compost is a natural slow-release fertilizer, providing a balanced array of nutrients.
- Manure: Aged manure is also a good source of nitrogen and other essential elements.
- Specific Soil Amendments: Depending on your soil test, you might add lime to raise pH and add calcium, or sulfur to lower pH and add sulfur.
When and How to Add Nutrients
- Timing: It’s generally best to incorporate fertilizers into the soil before planting. Some can be applied as a top dressing during the growing season.
- Application: Follow the recommended application rates on fertilizer packaging. Over-fertilizing can harm plants and pollute waterways.
- Watering: Water thoroughly after applying fertilizers to help them dissolve and be absorbed by the soil.
Advanced Techniques: Double Digging and Raised Beds
For gardeners seeking optimal soil conditions, a couple of more involved techniques can make a significant difference.
Double Digging
Double digging is an intensive method that loosens the soil to a greater depth, improving drainage and aeration significantly. It’s best suited for areas where soil compaction is a major issue or for planting deep-rooted vegetables.
How to Double Dig:
- Mark Your Bed: Define the area you’ll be double digging.
- Dig the First Trench: Dig a trench about a shovel’s depth (around 12 inches) along one edge of the bed. Place the removed soil on a tarp or wheelbarrow.
- Loosen the Second Trench: Use a garden fork to break up the soil at the bottom of the first trench. Do not remove this soil, just loosen it. If you have particularly stubborn soil, you can add some compost or other organic matter here.
- Fill the First Trench: Shovel the soil from the next trench into the first trench.
- Repeat: Continue digging the next trench, loosening the subsoil, and then shoveling the topsoil into the previous trench.
- Final Trench: The last trench will be filled with the soil you initially removed.
- Level and Amend: Rake the bed smooth and add a final layer of compost to the surface.
Pros: Extremely effective for deep soil loosening and aeration.
Cons: Labor-intensive and time-consuming.
Raised Beds
Raised beds are garden beds that are elevated above ground level. They offer a controlled environment for your soil, making preparation and maintenance easier.
-
Benefits of Raised Beds:
- Excellent Drainage: The elevated nature ensures water drains away efficiently.
- Warmer Soil: Soil in raised beds warms up faster in spring, allowing for earlier planting.
- Reduced Soil Compaction: You don’t walk on the planting area, preventing compaction.
- Easier Weed Control: Less chance of weeds blowing in or spreading from surrounding areas.
- Accessibility: Can be built at heights that reduce bending and kneeling.
- Customizable Soil Mix: You control exactly what goes into the bed.
-
Preparing Raised Beds for Spring:
- Inspect the Structure: Check for any damage to the bed walls and make repairs.
- Clear Debris: Remove any fallen leaves, old plant matter, or weeds from the previous season.
- Add New Soil Mix: Raised beds typically require a mix of topsoil, compost, and other organic matter. As your beds are already contained, you’ll be adding this mix rather than amending existing native soil. A good ratio is often 60% topsoil, 30% compost, and 10% other amendments like perlite for drainage or peat moss for moisture retention.
- Level the Surface: Ensure the soil is spread evenly within the bed.
Mulching: The Finishing Touch
Once your beds are prepped, adding a layer of mulch is an excellent finishing step.
What is Mulching?
Mulching is the practice of covering the soil surface around your plants with a layer of material.
Benefits of Mulching
- Moisture Retention: Mulch helps reduce water evaporation from the soil, keeping your plants hydrated.
- Weed Suppression: A good layer of mulch blocks sunlight, preventing weed seeds from germinating.
- Temperature Regulation: Mulch insulates the soil, keeping it cooler in summer and warmer in winter.
- Soil Improvement: Organic mulches, like wood chips or straw, will decompose over time, adding nutrients and improving soil structure.
- Erosion Control: Mulch helps prevent soil from being washed away by rain or wind.
Types of Mulch
-
Organic Mulches:
- Wood Chips/Bark: Durable, long-lasting, and aesthetically pleasing.
- Straw: Excellent for vegetable gardens, provides nutrients as it breaks down. Use seed-free straw.
- Shredded Leaves: A free and readily available option that enriches the soil.
- Grass Clippings: Apply in thin layers to prevent matting and ensure they dry out.
- Compost: Can be used as a light top dressing mulch.
-
Inorganic Mulches:
- Gravel/Stone: Permanent, but don’t improve soil quality.
- Plastic Sheeting: Suppresses weeds effectively but doesn’t allow for air or water penetration, and can overheat soil.
How to Mulch
Apply a layer of 2-3 inches of mulch around your plants. Keep mulch a few inches away from the stems of plants to prevent rot and discourage pests.
Summary of Spring Garden Bed Prep Steps
To recap, here’s a concise checklist for preparing your garden beds for spring:
| Step | Description | Timing |
|---|---|---|
| Clear Debris | Remove old plants, leaves, twigs, and litter. | Early Spring/Late Winter |
| Weed Removal | Pull out any visible weeds to prevent them from seeding. | Early Spring |
| Soil Testing | Send a sample to the lab or use a home kit to check pH and nutrient levels. | Early Spring |
| Soil Aeration | Loosen compacted soil using a fork or broadfork. | Early Spring |
| Soil Amendment | Incorporate compost, aged manure, or other organic matter to improve soil structure and fertility. | Early Spring |
| Adding Nutrients | Apply fertilizers based on soil test results (organic options are preferred). | Pre-Planting |
| Advanced Techniques | Consider double digging for deep soil loosening or preparing raised beds. | As needed |
| Mulching | Apply a 2-3 inch layer of organic mulch around plants to retain moisture and suppress weeds. | After Planting (or Pre-Emergence) |
Frequently Asked Questions (FAQ)
Q1: How much compost should I add to my garden beds?
A1: Aim for a layer of 2-4 inches of compost spread evenly over the surface of your garden beds. This can then be gently incorporated into the top 4-6 inches of soil.
Q2: When is the best time to prepare garden beds for spring?
A2: The ideal time is in early spring, after the soil has had a chance to thaw and dry out a bit. However, many preparatory tasks, like clearing debris and adding compost, can be done in the late fall to get a head start.
Q3: My soil is very clay-heavy. What are the best amendments for it?
A3: Clay soils benefit greatly from large amounts of organic matter, such as compost, aged manure, and leaf mold. These amendments help to break up the dense clay particles, improving drainage and aeration. Gypsum can also be beneficial for clay soils.
Q4: My soil is very sandy. What are the best amendments for it?
A4: Sandy soils drain very quickly and don’t hold nutrients well. Adding plenty of compost, aged manure, and peat moss (or coir) will help improve its water and nutrient-holding capacity.
Q5: How do I know if my soil needs lime?
A5: A soil test is the most reliable way to determine if your soil needs lime. If the pH is below 6.0, liming is generally recommended to raise it. Follow the specific recommendations from your soil test report.
Q6: Can I skip soil testing if my garden grew well last year?
A6: While your garden may have performed well, soil nutrients can become depleted over time. Soil testing provides an accurate baseline and helps you make informed decisions about amendments, ensuring your plants get exactly what they need for optimal health and yield.
By following this comprehensive guide, you’ll set the stage for a vibrant and productive gardening season. Happy prepping!