
Can you insulate under a mobile home? Absolutely! Insulating under your mobile home is a crucial step toward creating a warmer, more comfortable living space and significantly reducing your energy bills. This guide will walk you through everything you need to know to properly insulate the underside of your mobile home, turning it into a cozy and energy-efficient haven.
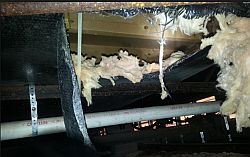
Image Source: underhomearmor.com
Why Insulate Under Your Mobile Home?
Many mobile homes, especially older ones, were not built with robust under-floor insulation. This oversight leads to a host of problems:
- Cold Floors: In cooler months, the floor can feel like an ice rink.
- Drafts and Air Leaks: Uninsulated undersides are prime areas for cold air to enter your home.
- High Energy Bills: Your heating system works overtime to compensate for heat loss through the floor.
- Pest Infestations: Gaps and openings can invite unwanted critters into your living space.
- Plumbing Freezing: In colder climates, exposed pipes can freeze and burst.
Proper insulation seals your home, keeps heat where it belongs, and makes your mobile home much more pleasant and affordable to live in. This tutorial focuses on weatherproofing mobile home underside and specifically addresses mobile home skirting insulation and crawl space insulation mobile home.
Preparing for Insulation: What You Need to Know
Before you dive in, a little preparation goes a long way.
H3: Assessing Your Underbelly
First, you need to understand what you’re dealing with. Most mobile homes have an underbelly, which is a protective layer made of thin material (often vinyl or metal) covering the underside of the floor. This underbelly serves to protect the insulation and plumbing from the elements and pests.
Key things to check:
- Damage: Look for any tears, holes, or damage to the existing underbelly. These will need to be repaired before you can insulate effectively.
- Existing Insulation: Note the type and condition of any existing insulation. Is it fiberglass batts, spray foam, or something else? Is it wet, compressed, or missing in spots?
- Obstructions: Identify any pipes, wires, or ductwork that might be in the way. You’ll need to work around these.
- Moisture: Check for any signs of water damage or moisture. You must address any leaks or dampness before insulating, as moisture can lead to mold and rot.
H3: Safety First!
Working under a mobile home can be cramped and dirty. Prioritize safety:
- Level Ground: Ensure the mobile home is parked on level ground and is stable. Use sturdy jack stands if you need to lift or support any part of the home.
- Work Lights: Good lighting is essential for seeing what you’re doing.
- Protective Gear: Wear sturdy gloves, eye protection (safety glasses or goggles), a dust mask or respirator (especially if dealing with old insulation), and old clothing.
- Ventilation: If you’re using spray foam or adhesives, ensure good ventilation.
H3: Gathering Your Tools and Materials
Here’s a list of common tools and materials you might need:
Tools:
- Utility knife or heavy-duty scissors
- Measuring tape
- Staple gun and staples
- Caulking gun
- Screwdriver or drill with appropriate bits
- Putty knife or scraper
- Heavy-duty tape (e.g., foil tape, construction tape)
- Ladder or step stool
- Work gloves
- Safety glasses
- Dust mask/respirator
- Flashlight or work light
Materials (Choose based on your insulation method – see below):
- Insulation:
- Rigid foam boards (XPS or polyiso)
- Fiberglass batts
- Mineral wool batts
- Spray foam insulation (DIY kits or professional application)
- Vapor Barrier:
- Polyethylene sheeting (6-mil thickness is common)
- Foil-faced insulation (acts as its own vapor barrier)
- Sealants:
- Spray foam sealant
- Caulking
- Weatherstripping
- Repair Materials:
- Duct tape or foil tape for sealing seams
- Patching material for the underbelly
Insulating Under Mobile Home: Step-by-Step Tutorial
Now, let’s get down to the actual insulation process. The goal is to create a continuous barrier that prevents heat loss and air infiltration. We’ll cover the most common and effective methods for insulating a mobile home floor.
H3: Method 1: Rigid Foam Boards – A Durable Choice
Rigid foam boards are an excellent option for underside insulation mobile home. They are moisture-resistant, have good R-values, and are relatively easy to work with. This method is particularly effective for crawl space insulation mobile home where you can fit the boards snugly.
H4: Step 1: Repair the Underbelly
Before applying any insulation, meticulously repair any rips or holes in your existing underbelly. Use sturdy tape like foil tape or a patch kit. Ensure the underbelly is as airtight as possible.
H4: Step 2: Measure and Cut Foam Boards
Measure the spaces between your floor joists. Rigid foam boards come in standard sizes (e.g., 4×8 feet) and can be cut to fit.
- Measure Carefully: Measure the width and length of each bay between the joists.
- Cut Precisely: Use a sharp utility knife or a specialized foam saw to cut the boards. Aim for a snug fit. You want the boards to press firmly into place.
H4: Step 3: Install Foam Boards
Fit the cut foam boards snugly into the bays between the floor joists.
- Friction Fit: Ideally, the boards should fit so tightly that they stay in place on their own.
- Securing Boards: If a board feels loose, you can use expanding spray foam sealant to fill any small gaps around the edges, or secure them with a few screws with large washers.
H4: Step 4: Seal All Seams and Gaps
This is a critical step for weatherproofing mobile home underside. Any gaps will allow air to escape or enter, reducing the effectiveness of your insulation.
- Tape Seams: Use foil tape or high-quality construction tape to seal all the seams where the foam boards meet each other and where they meet the joists.
- Seal Around Obstructions: Use spray foam sealant to fill any gaps around pipes, wires, or ductwork that pass through the insulated areas.
H4: Step 5: Install a Vapor Barrier (If Needed)
Rigid foam boards are generally less permeable to moisture than fiberglass. However, if you used unfaced foam boards or live in a humid climate, installing a vapor barrier is a good idea.
- Material: Use 6-mil polyethylene sheeting.
- Installation: Drape the plastic sheeting over the joists and staple it securely. Overlap seams by at least 6 inches and tape them with foil tape. This barrier should be on the warm side of the insulation (usually the interior side of the floor). If your foam board has a foil facing, this often serves as the vapor barrier.
H4: Step 6: Reattach or Replace the Underbelly
Once the insulation is in place and sealed, reattach the original underbelly material. If it was too damaged, you might need to replace sections with new material. Ensure it’s securely fastened and creates a continuous barrier against the elements. This step is part of a comprehensive skirting insulation kit approach.
H3: Method 2: Fiberglass or Mineral Wool Batts – The Traditional Approach
Fiberglass or mineral wool batts are common and cost-effective. However, they require careful installation to prevent heat loss and must be protected from moisture. This is a good option for mobile home belly insulation if done correctly.
H4: Step 1: Prepare the Underbelly and Bays
- Repair: As with rigid foam, repair any holes or tears in the existing underbelly first.
- Clean: Remove any debris or old, damaged insulation from the bays.
H4: Step 2: Measure and Cut Insulation Batts
- Measure: Measure the width and length of each bay between the floor joists.
- Cut: Cut the batts slightly wider than the bay width. This “friction fit” is important for preventing air gaps. Batts should fit snugly between the joists. Don’t compress fiberglass too much, as this reduces its R-value.
H4: Step 3: Install Batts
- Fit Snugly: Place the cut batts into the bays, ensuring they fill the space completely without leaving gaps. The facing of the batt (if it has one, often paper or foil) should be positioned towards the heated interior of the home.
- Avoid Compression: Do not pack the batts too tightly.
H4: Step 4: Secure the Batts
Batts can sometimes sag or fall out over time. Secure them properly:
- Wiring or Netting: Use insulation support wires (also called insulation hangers or “tiger teeth”) or netting to hold the batts in place. Staple or screw these supports across the joists, pressing the batts firmly against the underside of the subfloor.
- Stapling Facing: If the batts have a paper or foil facing that extends beyond the batt, you can staple this facing to the sides of the joists. This also helps create a vapor barrier.
H4: Step 5: Seal All Seams and Gaps
This is crucial for insulating vapor barrier mobile home performance.
- Tape Joins: If you used facing, tape any seams in the facing with appropriate foil tape.
- Seal Penetrations: Use spray foam sealant or caulk to seal around any pipes, wires, or ducts that go through the insulated areas.
H4: Step 6: Install a Continuous Vapor Barrier
This is perhaps the most critical step when using fiberglass or mineral wool. These materials can absorb moisture, which severely degrades their insulating properties and can lead to mold.
- Material: Use 6-mil polyethylene sheeting.
- Installation: Drape the plastic sheeting over the joists, covering the newly installed insulation. Staple it securely to the sides of the joists. Overlap all seams by at least 6 inches and tape them thoroughly with foil tape. Ensure this vapor barrier is continuous and seals tightly to the perimeter of the mobile home. This creates your insulating vapor barrier mobile home.
H4: Step 7: Reattach or Replace the Underbelly
Secure the original underbelly material or replace it with new material to protect the insulation from the elements and pests.
H3: Method 3: Spray Foam Insulation – The Premium Solution
Spray foam insulation offers superior R-values, excellent air sealing capabilities, and acts as its own vapor barrier. It’s ideal for tight spaces and around complex pipework. This method is often considered the best for mobile home belly insulation.
H4: Step 1: Prepare the Area
- Clean and Repair: Thoroughly clean the underbelly and repair any damage. Ensure the area is dry.
- Protect: Cover any sensitive areas (like electrical boxes) or components that should not be sprayed with foam.
H4: Step 2: Apply Spray Foam
You have two main options:
- DIY Kits: These come in cans or kits with two components that mix as you spray. They are suitable for smaller areas or touch-ups.
- Follow Instructions: Read and follow the manufacturer’s instructions precisely. These kits require careful mixing and application.
- Ventilation: Ensure adequate ventilation when using DIY kits.
- Professional Installation: For larger areas or maximum effectiveness, hiring a professional spray foam installer is recommended. They have specialized equipment for consistent and thorough application.
H4: Step 3: Application Technique
- Fill the Bays: Spray the foam into the bays between the floor joists. The foam will expand to fill the cavity.
- Even Application: Aim for an even layer to achieve the stated R-value. Two to four inches of closed-cell spray foam is typically sufficient for mobile home floors.
- Seal Penetrations: Spray foam is excellent for sealing around pipes, wires, and ductwork as you go.
H4: Step 4: Trim Excess Foam (If Necessary)
Once the foam has cured (hardened), you can carefully trim any excess that protrudes beyond the joists using a sharp utility knife or saw.
H4: Step 5: Reinstall or Replace Underbelly
After the spray foam has fully cured, reattach or replace the underbelly material to protect the insulation.
Specific Considerations for Mobile Homes
Beyond the general insulation methods, there are a few mobile home specific aspects to consider.
H3: Mobile Home Skirting Insulation
The skirting around your mobile home is more than just decorative; it’s a critical component of your home’s thermal envelope. Insulating your skirting is essential for mobile home skirting insulation and preventing drafts from entering your home.
- Materials: Rigid foam boards or spray foam are excellent choices for insulating skirting.
- Installation: Cut rigid foam boards to fit behind the skirting panels or spray foam directly onto the inside of the skirting.
- Vents: Ensure skirting vents are not completely blocked, as they are necessary for ventilation to prevent moisture buildup under the home. You can insulate around these vents or use insulated vent covers.
- Skirting Insulation Kits: Many companies offer skirting insulation kit options that include pre-cut foam panels and necessary hardware.
H3: Heat Tape for Skirting and Pipes
In extremely cold climates, even with insulation, exposed pipes and skirting can be vulnerable to freezing.
- Heat Tape: Consider using self-regulating electric heat tape skirting mobile home or pipes. This tape generates heat when the temperature drops, preventing freezing.
- Proper Installation: Follow the manufacturer’s instructions carefully for installing heat tape. Ensure it’s rated for outdoor use and that all connections are waterproof.
- Thermostatic Control: Use a thermostat to control the heat tape, turning it on only when needed, to save energy.
H3: Insulating the Belly Pan (Underbelly)
The belly pan itself can be improved. Some modern mobile homes have insulated belly pans. If yours doesn’t, or if it’s damaged:
- Replacement: Consider replacing a damaged belly pan with a more robust, insulated version if possible.
- Adding Insulation Behind: If you can’t replace the belly pan, focus on adding the insulation layers described above directly above it, filling the bays.
Frequently Asked Questions (FAQ)
H5: How much does it cost to insulate under a mobile home?
The cost varies depending on the size of your mobile home, the type of insulation you choose, and whether you do it yourself or hire a professional. DIY insulation with fiberglass batts can cost a few hundred dollars, while rigid foam boards might be slightly more. Professional spray foam installation can range from $1,000 to $3,000 or more.
H5: What R-value do I need for mobile home floor insulation?
For most climates, an R-value between R-13 and R-19 is recommended for mobile home floors. Rigid foam boards typically offer R-5 to R-6 per inch, so a 3-4 inch board would meet these requirements. Fiberglass batts also come in various R-values.
H5: Can I use spray foam insulation from a can?
Yes, DIY spray foam cans can be effective for smaller areas, sealing gaps, or supplementing existing insulation. For a full underbelly insulation, consider the cost and effort versus professional installation or using batts/boards. Ensure you use it in a well-ventilated area and wear proper protective gear.
H5: Do I need a vapor barrier if I use rigid foam board?
If your rigid foam board has a foil facing on the side facing the interior of the home, it often acts as a sufficient vapor barrier. If you use unfaced foam boards, or live in a very humid or cold climate, adding a separate polyethylene vapor barrier is a good practice.
H5: How do I insulate my mobile home skirting?
You can insulate skirting by attaching rigid foam boards to the interior of the skirting panels or by applying spray foam. Ensure you don’t completely block necessary skirting vents.
H5: What is the best insulation for a mobile home?
The “best” insulation depends on your budget, climate, and DIY comfort level.
* Spray foam offers the highest R-value and best air sealing but is the most expensive.
* Rigid foam boards offer good R-value, moisture resistance, and are relatively easy to install.
* Fiberglass/Mineral Wool batts are cost-effective but require careful installation with a vapor barrier to prevent moisture issues.
H5: How often should I check my mobile home’s insulation?
It’s a good idea to inspect your insulation at least once a year, perhaps in the spring or fall, to check for any damage, moisture, or signs of pests.
Conclusion: A Warmer Home Awaits!
Insulating under your mobile home is a rewarding project that pays off in comfort and energy savings. By following these detailed steps, you can effectively seal your home, improve its thermal performance, and create a much cozier living environment. Whether you choose rigid foam, batts, or spray foam, remember that proper installation and meticulous sealing of all gaps are key to achieving the best results. Take the time to do it right, and enjoy the benefits of a warm, energy-efficient mobile home year-round.