
Yes, you can absolutely paint your kitchen cabinets yourself using a sprayer, and it’s often considered the best method for achieving a smooth, professional finish. This guide will walk you through everything you need to know for successful DIY cabinet spraying.
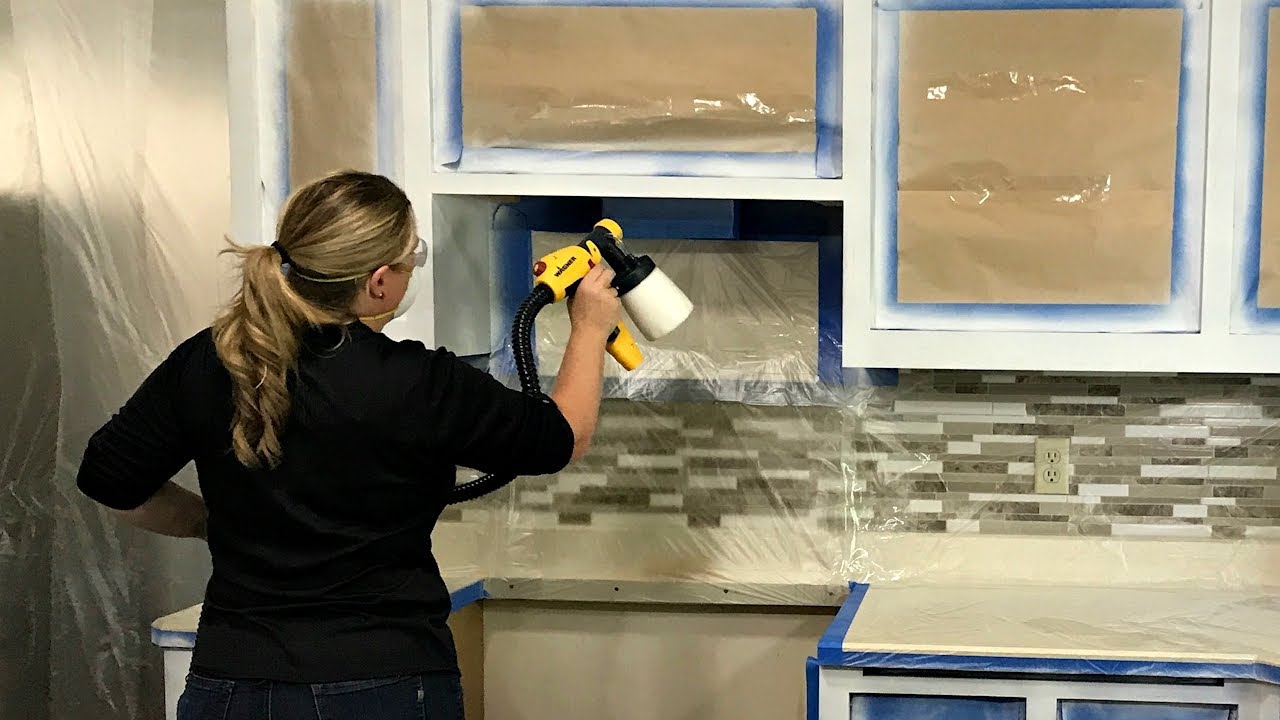
Image Source: i.ytimg.com
Why Spray Painting Cabinets is the Best Choice
When it comes to kitchen cabinet refinishing, the goal is a durable, beautiful, and factory-like finish. While brushing and rolling can work, they often leave visible brush strokes or roller marks, detracting from the overall aesthetic. Spray painting cabinets, on the other hand, offers a superior finish that elevates the entire look of your kitchen.
Benefits of Spray Painting
- Smooth, Flawless Finish: The primary advantage of spray painting is the ability to achieve an ultra-smooth, even coating without brush strokes or roller texture. This creates a professional, high-end look.
- Even Coverage: Paint is applied in a fine mist, ensuring consistent coverage across all surfaces, including intricate details and corners that are difficult to reach with a brush.
- Efficiency: While prep work takes time, the actual spraying process is generally faster than brushing or rolling, especially for large projects.
- Durability: When the right paint is used and applied correctly, a sprayed finish can be very durable and resistant to chipping and wear.
What Makes Spray Painting Superior for Cabinets?
The fine atomization of paint from a sprayer allows it to flow and level out beautifully. This means that as the paint dries, it creates a seamless surface. Brushes tend to push paint into the wood grain, and rollers can leave a textured finish. Spraying avoids these issues, resulting in a much more polished appearance.
Choosing the Right Sprayer: The Best Sprayer for Cabinets
Selecting the correct paint sprayer is crucial for achieving excellent results. Not all sprayers are created equal, and using the wrong one can lead to frustration and a poor finish.
Types of Paint Sprayers
- Airless Sprayers: These are powerful and fast, ideal for large projects and thicker paints. They use high pressure to atomize the paint. While effective, they can create overspray and require more skill to control for fine finishes.
- High-Volume, Low-Pressure (HVLP) Sprayers: These are generally considered the best sprayer for cabinets, especially for DIYers. They deliver a fine finish with minimal overspray. HVLP sprayers use a large volume of air at low pressure to atomize and propel the paint. This results in a more controlled application and less wasted paint.
- Compressed Air Sprayers: These use a compressor and a separate air source to atomize paint. They can produce excellent finishes but require a robust compressor and can be more complex to set up and use.
Recommendations for Cabinet Spraying
For DIY cabinet painting, an HVLP sprayer is highly recommended. They offer a great balance of performance, ease of use, and cost-effectiveness for achieving a professional finish on cabinets.
Key Features to Look for in an HVLP Sprayer:
- Adjustable Airflow and Paint Flow: This allows you to fine-tune the spray pattern and paint delivery for optimal results.
- Multiple Nozzle/Needle Sizes: Different projects and paint types benefit from different nozzle sizes. Having a few options provides versatility.
- Good Quality Components: Look for sprayers with durable materials and reliable performance.
- Ease of Cleaning: Cabinet painting involves multiple coats, so a sprayer that is easy to disassemble and clean is a major plus.
Popular HVLP Sprayer Brands for DIYers: Wagner, Fuji, Graco (though Graco is more known for airless, they have some HVLP options).
Understanding Your Sprayer
Before you even pick up a paint can, spend time reading the manual for your specific spray gun for cabinets. Practice on cardboard or scrap wood to get a feel for the trigger control, spray pattern, and paint flow.
The Essential Cabinet Painting Prep: Setting Yourself Up for Success
This is arguably the most critical stage of the entire cabinet painting process. Skipping or rushing the preparation will significantly impact the final outcome. Thorough cabinet painting prep is non-negotiable.
Step 1: Remove Cabinet Doors and Drawers
- Carefully remove all cabinet doors and drawer fronts.
- Label each door and drawer front with its corresponding cabinet location. A small piece of painter’s tape with numbering works well. This is crucial for reassembly.
- Remove all hardware (hinges, knobs, pulls). Store them safely, perhaps in labeled plastic bags.
Step 2: Clean Everything Thoroughly
Grease, grime, and old finishes will prevent new paint from adhering properly.
- For Cabinet Boxes: Use a degreaser (like TSP substitute or a specialized kitchen degreaser) and a sponge or cloth to clean all surfaces of the cabinet boxes. Rinse thoroughly with clean water and allow them to dry completely.
- For Doors and Drawer Fronts: Clean them the same way. You might want to lay them flat on sawhorses or a protected surface for easier cleaning.
Step 3: Sanding for Adhesion
Sanding creates a profile for the primer and paint to adhere to.
- Initial Sanding: For most cabinets, a medium-grit sandpaper (120-150 grit) is sufficient to scuff up the existing finish.
- For Heavily Finished or Glossy Cabinets: You might need to start with a slightly coarser grit (100-120 grit) but be careful not to remove too much of the original finish.
- Sanding Technique: Use a sanding block or an orbital sander for flat surfaces. For doors and drawer fronts with details, hand sanding is often best.
- Dust Removal: After sanding, thoroughly wipe down all surfaces with a tack cloth to remove all dust particles. This step cannot be overemphasized.
Step 4: Repair Imperfections
- Fill any holes, dents, or gouges with a good quality wood filler.
- Let the filler dry completely according to the manufacturer’s instructions.
- Sand the filled areas smooth and flush with the surrounding surface, using a fine-grit sandpaper (220 grit).
- Wipe down again with a tack cloth to remove all dust.
Step 5: Masking and Protection
This is where you protect everything you don’t want to paint.
- For Cabinet Boxes:
- Use high-quality painter’s tape (e.g., FrogTape or 3M Blue Tape) to mask off any areas adjacent to the cabinets that you don’t want overspray on, such as countertops, backsplashes, appliances, and floors.
- Consider using plastic sheeting or drop cloths to cover larger areas like countertops and floors. Use tape to secure the edges of the plastic sheeting.
- Ensure all openings into the cabinets (if you’re not removing drawers completely) are well-covered.
- For Doors and Drawer Fronts:
- If you are painting the backs of doors or drawer fronts, you will need to mask off the front of them before painting the back, and then repeat the process for the front.
- Alternatively, you can paint the front of the doors, let them dry, flip them over, and paint the back.
Priming for Durability and Color
Primer is essential for proper adhesion, blocking stains, and providing a uniform base for your paint color.
Choosing the Right Primer
For cabinet painting, you need a high-quality primer specifically designed for cabinetry or hard surfaces.
- Oil-Based Primers: These are excellent for blocking stains (especially from wood tannins) and provide a very durable base. They can have stronger fumes and longer dry times.
- Water-Based Primers (Latex/Acrylic): Many modern water-based primers are formulated for excellent adhesion and are easier to clean up. Look for those with good stain-blocking properties.
- Shellac-Based Primers: These are exceptional stain blockers and are very fast-drying, but they are also more difficult to work with and have strong fumes.
Recommendation: For most DIYers, a high-quality water-based primer specifically formulated for cabinets or furniture is a great choice.
How to Prime with a Sprayer
- Thinning the Primer: Many primers need to be thinned slightly to spray properly, especially with an HVLP sprayer. Check the product’s instructions for thinning ratios. Use the recommended thinner (usually water for latex, mineral spirits for oil-based).
- Spraying Technique (Same as Painting): Apply thin, even coats. Overlap each pass by about 50%. Keep the sprayer moving at a consistent speed.
- Drying Time: Allow the primer to dry completely according to the manufacturer’s instructions.
- Light Sanding (Optional but Recommended): After the primer has dried, you can lightly sand it with a fine-grit sandpaper (220 grit) to knock down any minor imperfections or dust nibs. Wipe clean with a tack cloth.
Selecting the Best Cabinet Paint Types
The type of paint you choose will significantly impact the durability, finish, and maintenance of your newly painted cabinets.
Cabinet Paint Options
- Alkyd Enamels (Oil-Based): These paints are known for their exceptional hardness, durability, and smooth finish. They level out beautifully and resist scratches and wear. However, they have strong fumes, require mineral spirits for cleanup, and can yellow over time, especially in certain lighting conditions.
- Water-Based Acrylic Enamels (Latex): Modern water-based acrylic enamels have come a long way. Many are formulated specifically for cabinetry and offer excellent durability, a smooth finish, and easy cleanup with soap and water. They have low VOCs and less odor than oil-based paints. This is often the preferred choice for DIYers.
- Hybrid Enamels (Waterborne Alkyds): These paints combine the durability and hardness of oil-based paints with the ease of use and low odor of water-based paints. They are a fantastic option if you can find a high-quality one.
Paint Sheen
The sheen you choose affects both the look and the durability.
- Satin: A popular choice for cabinets. It offers a soft sheen, is more durable and easier to clean than flat or eggshell finishes, and hides minor imperfections well.
- Semi-Gloss: Provides a higher sheen, making it very durable and easy to wipe clean. However, it can highlight imperfections more than satin.
- Gloss: Offers the highest shine and is the most durable and easiest to clean. It’s best suited for very smooth surfaces and can make imperfections very noticeable.
Recommendation: A satin or semi-gloss sheen is generally recommended for kitchen cabinets.
How to Spray Paint Wood Cabinets: The Step-by-Step Process
Now that your prep is done and you’ve chosen your paint, it’s time to spray.
Step 1: Prepare Your Spraying Area
- Ensure the area where you will be spraying doors and drawer fronts is well-ventilated, dust-free, and protected from overspray. A garage, a well-ventilated shed, or an outdoor space (weather permitting) are good options.
- Set up sawhorses to hold your doors and drawer fronts.
- Have your paint, sprayer, extension cords, and rags readily accessible.
Step 2: Set Up Your Sprayer
- Refer to your sprayer’s manual for assembly and setup.
- If thinning your paint, do so according to the paint manufacturer’s recommendations. Use a paint strainer to ensure no clumps get into your paint cup.
- Fill your paint cup or bucket.
Step 3: Dial In Your Sprayer Settings
This is crucial for a good finish.
- Test Spray: Always start by testing your spray pattern on a piece of cardboard.
- Adjust Airflow: Adjust the air pressure to achieve a fine mist. You want the paint to atomize cleanly.
- Adjust Paint Flow (Volume): Start with a lower paint flow and gradually increase it until you achieve good coverage without runs.
- Adjust Spray Pattern Width: Most sprayers allow you to adjust the pattern from a narrow to a wide fan. For cabinets, a medium to wide fan is usually best.
Troubleshooting Common Spray Issues:
| Issue | Cause | Solution |
|---|---|---|
| Runs/Sags | Too much paint flow, spraying too close, or moving too slowly. | Reduce paint flow, increase air pressure slightly, move sprayer faster, or hold it further away. |
| Orange Peel | Paint is too thick, not enough air pressure, or drying too fast. | Thin paint, increase air pressure, reduce paint flow, or use a slower-drying paint additive. |
| Uneven Coverage | Inconsistent sprayer speed or distance, clogged nozzle. | Maintain consistent speed and distance, clean the spray tip regularly, check for paint clogs. |
| “Guns” or “Puddles” | Too much paint in one spot. | Reduce paint flow, use lighter passes, and ensure proper overlap. |
| Dust Nibs | Dust in the air or on the surface. | Ensure the spray area is clean, use a tack cloth on surfaces before spraying, and consider air filtration. |
Step 4: Spray the Doors and Drawer Fronts
- Technique: Hold the sprayer about 8-12 inches away from the surface.
- Trigger Control: Start the spray before you reach the edge of the surface and continue spraying past the edge before releasing the trigger. This prevents heavy spots at the beginning and end of each pass.
- Overlap: Overlap each spray pass by about 50%. This ensures even coverage.
- Direction: Work in a consistent direction (e.g., top to bottom or side to side). For doors with a frame and panel, spray the panel first, then the frame, and finally the edges.
- Thin Coats: Apply multiple thin coats rather than one thick coat. This is key to a good finish and prevents runs. Allow adequate drying time between coats as recommended by the paint manufacturer.
- Drying Time: Refer to the paint can for specific recoat times. Rushing between coats can lead to adhesion issues.
Step 5: Spray the Cabinet Boxes
- Once the doors and drawer fronts are dry and ready for a second coat (or finished), you can move on to the cabinet boxes.
- Ensure all masked areas are secure.
- Use the same spraying technique as for the doors. Work systematically through each cabinet.
- Pay attention to the inside edges of the cabinet frames.
Step 6: Allow Proper Drying and Curing
- Drying Time: This is the time it takes for the paint to be dry to the touch.
- Curing Time: This is the time it takes for the paint to reach its maximum hardness and durability. It can take several weeks. During the curing period, be extra gentle with your cabinets. Avoid harsh cleaning or abrasive materials.
Step 7: Reassemble
- Once the paint is fully dry (usually after 24-48 hours for handling, but check your paint can), you can carefully reattach the doors and drawer fronts.
- Reinstall hardware.
Cabinet Paint Types: A Deeper Dive
Let’s look more closely at the different paint formulations you might encounter and what makes them suitable for kitchen cabinetry.
Water-Based Acrylic Enamels
- Pros: Low odor, fast drying, easy cleanup with soap and water, good flexibility, excellent color retention.
- Cons: Can be less durable than oil-based if not formulated for high-traffic areas, may require a good bonding primer for certain surfaces.
- Good For: DIYers who prioritize ease of use and low VOCs. Look for premium acrylic enamels designed for cabinets or trim.
Alkyd Enamels (Oil-Based)
- Pros: Extremely durable, hard, and scratch-resistant finish. Excellent leveling properties for a smooth look.
- Cons: Strong odor, requires mineral spirits for cleanup, longer drying times, can yellow over time with light exposure.
- Good For: Those seeking maximum durability and willing to deal with the cleanup and fumes.
Hybrid Enamels (Waterborne Alkyds)
- Pros: Combines the hardness and durability of alkyds with the low odor and easy cleanup of latex. Excellent adhesion and leveling.
- Cons: Can be more expensive than traditional latex paints, availability might be more limited.
- Good For: A great compromise for a durable, professional finish with DIY-friendly cleanup.
How to Spray Paint Wood: Essential Techniques
The principles of spray painting wood are consistent whether it’s cabinets or furniture.
Understanding Paint Viscosity and Thinning
Paint viscosity (thickness) is critical for proper spraying. Most paints are too thick to spray directly out of the can.
- Viscosity Cup: Professional painters use a viscosity cup (like a Zahn cup or Ford cup) to measure the thickness. You can also gauge it by how it flows from the stirring stick.
- Thinning Ratio: Always follow the paint manufacturer’s recommendations for thinning.
- Latex Paints: Usually thinned with water.
- Oil-Based Paints: Thinned with mineral spirits.
- Hybrid Paints: Thin with water or as recommended by the manufacturer.
- Test Spray: After thinning, always do a test spray to ensure the paint is flowing correctly. If it’s sputtering or creating a heavy, drippy pattern, it might be too thin. If it’s creating an orange peel or very granular texture, it might be too thick.
Nozzle Selection
The size of the nozzle (or tip) on your spray gun is important for matching the paint type and viscosity.
- Smaller Nozzles: Best for thinner paints and finer finishes.
- Larger Nozzles: Best for thicker paints and faster coverage.
Refer to your sprayer’s manual or the paint manufacturer’s recommendations for the appropriate nozzle size. For cabinet painting with most HVLP sprayers, a 1.3mm to 1.8mm nozzle is common.
Spraying Motion and Overlap
- Consistent Speed: Move the spray gun at a steady, consistent speed across the surface.
- Consistent Distance: Maintain a constant distance (8-12 inches) from the surface.
- Overlap: Each spray pass should overlap the previous one by about 50%. This ensures an even coat without light or dark areas.
- Trigger Control: Start the spray before the edge of the workpiece and release the trigger after you’ve passed the edge. This avoids splattering and dense buildup at the start and end of each pass.
Multiple Thin Coats vs. One Thick Coat
This is a fundamental rule of spray painting. Applying multiple thin coats allows the paint to flow and level out properly, leading to a much smoother and more durable finish. Thick coats are prone to runs, sags, and uneven drying.
Frequently Asked Questions (FAQ)
Q1: Can I spray paint kitchen cabinets with a regular house paint sprayer?
While some standard house paint sprayers can work, they often produce a coarser finish with more overspray compared to dedicated HVLP sprayers. For the best results on cabinets, an HVLP sprayer is highly recommended.
Q2: What is the best paint to use for spraying kitchen cabinets?
High-quality acrylic enamel or hybrid enamel paints formulated for cabinetry are generally the best choices for DIYers, offering durability and ease of use.
Q3: Do I need to sand before priming kitchen cabinets?
Yes, sanding is crucial for ensuring the primer and subsequent paint coats adhere properly to the existing finish. A light scuff sanding is usually sufficient.
Q4: How many coats of paint should I apply?
Typically, two to three thin coats of paint are recommended, with light sanding (using 220-320 grit sandpaper) and cleaning between coats for the smoothest finish.
Q5: How long should I wait between coats of paint when spraying?
Always follow the paint manufacturer’s recommendations. Generally, wait at least 4-6 hours for water-based paints, and potentially longer for oil-based paints, before applying the next coat.
Q6: Can I spray paint over existing cabinet finish without stripping it?
Yes, if the existing finish is in good condition (not peeling or flaking), you can often paint over it after proper cleaning, sanding, and priming.
Q7: My sprayed cabinets have runs. What did I do wrong?
Runs typically occur from applying the paint too thickly, spraying too close to the surface, or not moving the sprayer consistently. Reduce paint flow, increase air pressure, maintain a consistent distance, and move the sprayer faster.
By following this comprehensive guide, you’ll be well-equipped to tackle your kitchen cabinet refinishing project with confidence and achieve stunning, professional results using a spray gun. Happy spraying!