
Can you make sauerkraut in a crock? Yes, absolutely! Making sauerkraut in a crock is a time-honored tradition and a wonderfully simple way to create this delicious, gut-friendly food. This guide will walk you through every step, from selecting your ingredients to enjoying your own homemade batch of fermented cabbage.
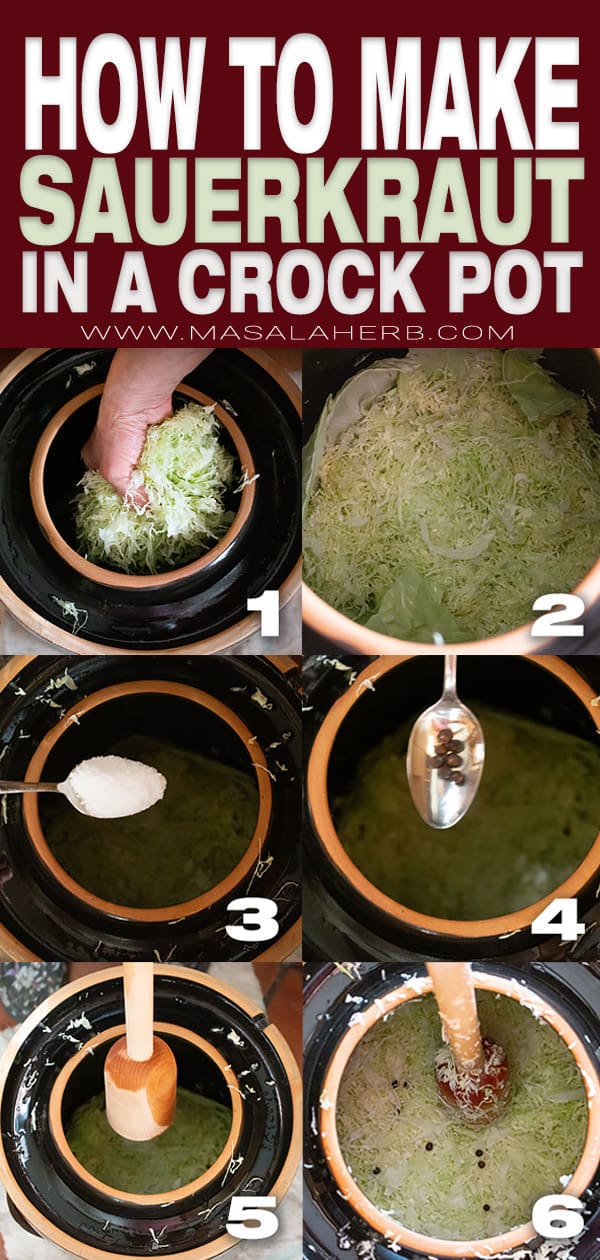
Image Source: www.masalaherb.com
Why Make Your Own Sauerkraut?
Making sauerkraut at home offers several amazing benefits. Firstly, it’s incredibly cost-effective. Buying good quality sauerkraut from the store can be pricey, especially if you consume it regularly. Making it yourself dramatically reduces the cost per serving. Secondly, you have complete control over the ingredients. You can ensure you’re using fresh, high-quality cabbage and salt, avoiding any unnecessary additives or preservatives often found in commercial products.
Most importantly, homemade sauerkraut is a powerhouse of beneficial bacteria. Through the process of lactic acid fermentation, the cabbage transforms into a probiotic-rich food that can support a healthy gut microbiome. This culturing vegetables process enriches your diet with live cultures that are essential for digestion and overall well-being. You’ll be creating raw sauerkraut, meaning the beneficial bacteria remain alive and active.
What You’ll Need: Gathering Your Supplies
Before you dive into kraut making, gather your essential tools and ingredients.
Essential Ingredients:
- Cabbage: The star of the show! For beginners, green cabbage is the most common and easiest to work with. Look for firm, heavy heads of cabbage without any bruises or yellowing leaves. You’ll typically need about 2-3 pounds (around 1-1.5 kg) of cabbage per gallon-sized crock.
- Salt: This is crucial for drawing out moisture from the cabbage and creating a brine, as well as inhibiting the growth of undesirable bacteria. Use non-iodized salt, such as pickling salt, sea salt, or Himalayan pink salt. Iodine can interfere with the fermentation process. The general ratio is 2-3 tablespoons of salt per 5 pounds of cabbage.
- Optional Spices: While plain sauerkraut is delicious, you can add a variety of spices to enhance the flavor. Popular choices include caraway seeds, juniper berries, dill, mustard seeds, or peppercorns.
Essential Equipment:
- Food-Grade Crock: This is the traditional vessel for kraut making. A ceramic or glass food-grade crock with a lid is ideal. Look for crocks that are designed for fermentation, often featuring a water-seal lid or an area for an airlock system. A 1-gallon crock is a good starting size for beginners.
- Large Mixing Bowl: You’ll need a large bowl for shredding and salting the cabbage.
- Cutting Board and Sharp Knife: For preparing the cabbage.
- Shredder or Mandoline (Optional): While you can shred cabbage with a knife, a mandoline or a dedicated shredding attachment on a food processor can make the process much faster and create more uniform shreds.
- Tamper or Pestle: To pound and compress the cabbage in the crock, which helps release its juices and create the necessary brine. A wooden tamper or a clean, sturdy pestle works well.
- Weight: To keep the cabbage submerged under the brine. Traditionally, a flat, clean rock was used. Today, you can use fermentation weights made of glass or ceramic, or even a clean glass jar filled with water. The key is to find something that fits snugly inside the crock, above the cabbage.
- Lid: To cover the crock and protect the fermenting cabbage. If your crock doesn’t have a lid, you can use a clean piece of cheesecloth secured with a rubber band, but a lid is preferred for better protection and moisture retention. For advanced control, consider an airlock system.
Getting Started: Preparing Your Cabbage
The first step in kraut making is preparing your cabbage.
Step-by-Step Preparation:
- Clean Your Cabbage: Remove any wilted or dirty outer leaves from the cabbage head. Save a few of the clean outer leaves to use later as a top layer.
- Core the Cabbage: Cut the cabbage into quarters. Then, carefully cut out the dense core from each quarter.
-
Shred the Cabbage: You can shred the cabbage using a sharp knife and cutting board, a mandoline, or a food processor. Aim for shreds that are about as thick as a dime. Uniformity in shred size helps with even fermentation.
- Knife Method: Lay a quartered cabbage wedge flat on your cutting board. Make thin, even slices across the wedge.
- Mandoline Method: Use the shredding blade on your mandoline and carefully guide the cabbage wedges through. Always use the safety guard.
- Food Processor Method: Use the shredding disk attachment on your food processor. Feed the cabbage wedges through.
-
Weigh Your Cabbage: It’s helpful to weigh your shredded cabbage to accurately measure the amount of salt needed.
The Salting and Brining Process
Salting is a critical step in kraut making. It draws out the natural juices from the cabbage, creating a brine that will cover the shreds and facilitate the lactic acid fermentation.
Adding the Salt:
- Combine Cabbage and Salt: Place your shredded cabbage in the large mixing bowl. Sprinkle the measured salt evenly over the cabbage. If you are using spices, add them now as well.
-
Massage and Pound: Begin to massage and squeeze the cabbage with your hands. The salt will start to draw out moisture. Continue to massage and gently pound the cabbage for about 5-10 minutes. You should see a good amount of liquid accumulating at the bottom of the bowl. The cabbage will also start to wilt and become more pliable. This pounding helps to break down the cell walls, releasing more juice.
- Tip: If you find it difficult to get enough liquid, you can let the salted cabbage sit for 15-20 minutes, then massage it again.
Creating the Brine:
The goal is to have enough natural brine from the cabbage to completely cover it once it’s packed into the crock. If, after massaging, you don’t have enough liquid to cover the cabbage, you can add a little extra brine.
- To Make Additional Brine: Dissolve 1 teaspoon of non-iodized salt in 1 cup of non-chlorinated water. Use this sparingly, only if needed.
Packing Your Crock: The Art of Fermentation
This is where the magic truly begins, transforming simple cabbage into delicious sauerkraut.
Packing Steps:
- Layering the Cabbage: Begin to pack the salted cabbage into your clean food-grade crock. Add handfuls of cabbage at a time and press down firmly with your tamper or pestle. The goal is to compact the cabbage tightly, forcing out any air pockets and encouraging the brine to rise.
- Building the Brine Level: As you pack, the brine should start to rise. Continue layering and tamping until all the cabbage is in the crock. You want to fill the crock about 2-3 inches from the top to allow for expansion during fermentation.
- Ensuring Submersion: Once all the cabbage is packed, press down one last time. The brine level should be at least 1 inch above the top layer of cabbage. If it’s not, you may need to add a bit more of your pre-made salt brine.
- Adding a Protective Layer: Place one or two of the reserved outer cabbage leaves on top of the shredded cabbage. This helps to keep any smaller bits of shredded cabbage from floating to the surface, which can prevent mold.
- Applying the Weight: Place your fermentation weight on top of the cabbage leaves. This is crucial to keep everything submerged below the brine. If the weight shifts or doesn’t quite cover everything, you might need to adjust it or add a smaller weight on top.
The Fermentation Process: Patience and Observation
Now that your crock is packed, it’s time to let nature do its work.
Setting Up for Fermentation:
- Covering the Crock: Place the lid on your crock. If you are using a crock with a water-seal lid, add water to the channel as per the manufacturer’s instructions. This creates an anaerobic environment, allowing beneficial bacteria to thrive while preventing mold and unwanted airborne contaminants from entering. If you don’t have a water-seal lid, ensure the lid is snug. For extra protection, you can cover the opening with a clean cloth secured with a rubber band, followed by the lid. An airlock system attached to the lid is an excellent way to manage gas release during active fermentation.
- Choosing a Location: Place the crock in a cool, dark place with a consistent temperature. An ideal fermentation temperature is between 60-70°F (15-21°C). A basement, pantry, or cellar often works well. Avoid direct sunlight.
What to Expect During Fermentation:
- Initial Activity (Days 1-3): You might see some bubbling activity starting within a day or two, especially in warmer temperatures. This is a sign that the lactic acid bacteria are beginning to work. A cloudy film or foam might appear on the surface; this is normal kraut making activity and can be skimmed off if desired. Ensure the cabbage remains submerged.
- Active Fermentation (Days 4-14): The bubbling will become more vigorous. The brine may become cloudy. The cabbage will start to soften and develop its characteristic tangy flavor. Skim off any foam or scum that appears on the surface regularly (daily is best initially). This is a crucial step in keeping the kraut clean and preventing spoilage.
- Slower Fermentation (Weeks 2-4 and beyond): The bubbling will slow down. The aroma will become more pronounced and pleasantly sour. The color of the sauerkraut will deepen.
Duration of Fermentation:
The time it takes for sauerkraut to ferment depends on several factors:
- Temperature: Warmer temperatures speed up fermentation, while cooler temperatures slow it down.
- Salt Concentration: A slightly higher salt concentration can slow fermentation.
- Personal Preference: Some people prefer a milder, crisper sauerkraut, while others enjoy a more intensely sour and softer fermented cabbage.
As a general guideline:
- 1-2 Weeks: Will yield a milder, crisper sauerkraut.
- 3-4 Weeks: Will result in a tangier, softer sauerkraut.
- Longer: For a more deeply fermented, complex flavor.
You can start tasting your sauerkraut after about a week to gauge its progress and decide when it’s reached your desired level of sourness.
Storing Your Homemade Sauerkraut
Once your sauerkraut has reached your desired taste and texture, it’s time to store it.
Storage Methods:
- Refrigeration: The most common and recommended method is to transfer the finished sauerkraut into clean glass jars or airtight containers. Make sure to pack it tightly, ensuring the brine covers the sauerkraut. Store the jars in the refrigerator. Cold temperatures significantly slow down the fermentation process, allowing you to enjoy your kraut for several months.
- Canning (Optional): While refrigeration is preferred for preserving the live probiotics, you can water-bath can sauerkraut if you wish to store it at room temperature for longer periods. However, this process will kill the beneficial bacteria, resulting in a pasteurized product. Follow standard canning procedures for acidic foods.
Troubleshooting Common Sauerkraut Issues
Even with the best intentions, you might encounter a few bumps along the way in your kraut making journey.
Common Issues and Solutions:
- Mold: If you see fuzzy or colored mold on the surface, it’s usually a sign that the cabbage wasn’t fully submerged or that there was too much air exposure. If it’s just a thin, white film (kahm yeast), it’s harmless and can be skimmed off. However, if you see fuzzy mold, it’s best to discard the batch to be safe.
- Prevention: Ensure the cabbage is always submerged under the brine. Keep the crock clean. Skim off any foam or scum regularly. Use an airlock system for better protection.
- Mushy Sauerkraut: This can happen if the fermentation temperature is too high, the salt ratio is too low, or if the cabbage was over-processed.
- Prevention: Ferment in a cooler environment. Use the correct salt ratio. Avoid shredding the cabbage too finely.
- No Bubbling: If you don’t see any activity, it could be due to a few reasons:
- Insufficient Salt: The salt concentration might be too low, hindering the bacteria.
- Too Cold: The fermentation temperature might be too low.
- Chlorinated Water: If you used chlorinated water in your brine, it can inhibit bacterial growth.
- Solution: Check your salt ratio, try to find a warmer spot for fermentation, and always use non-chlorinated water for any added brine.
- Slimy Texture: Sometimes, sauerkraut can develop a slimy texture, often due to the presence of certain types of bacteria that thrive in slightly different conditions.
- Prevention: Maintain proper salt levels and fermentation temperatures. Thoroughly clean your equipment.
Advanced Techniques and Variations
Once you’ve mastered the basic kraut making, you can explore variations.
Flavor Enhancements:
- Garlic and Dill: Add a few cloves of smashed garlic and fresh dill fronds during the packing stage.
- Spicy Kick: Include sliced chili peppers or a pinch of red pepper flakes.
- Root Vegetables: Experiment with adding shredded carrots, beets, or radishes for color and different flavor profiles.
Using Different Cabbage Varieties:
While green cabbage is standard, you can experiment with:
- Red Cabbage: This will produce a beautifully colored sauerkraut but may ferment slightly differently.
- Savoy Cabbage: Offers a more delicate flavor and texture.
The Science of Sauerkraut: Lactic Acid Fermentation Explained
Sauerkraut is a prime example of lactic acid fermentation, a natural process that preserves food and creates beneficial compounds.
How it Works:
- Salt Draws Out Water: The salt draws water out of the cabbage cells through osmosis.
- Anaerobic Environment: When the cabbage is packed tightly and submerged in brine, it creates an anaerobic environment (low oxygen).
- Beneficial Bacteria Multiply: Naturally occurring bacteria on the cabbage, primarily Leuconostoc species, begin to convert sugars in the cabbage into lactic acid.
- Lactic Acid Production: As lactic acid is produced, the pH of the brine decreases, making it more acidic. This acidity acts as a natural preservative, inhibiting the growth of spoilage-causing bacteria and pathogens.
- Flavor and Texture Development: Other beneficial bacteria, such as Lactobacillus species, also thrive in this acidic environment and continue the fermentation, developing the characteristic tangy flavor and softer texture of sauerkraut.
This process of culturing vegetables not only preserves the cabbage but also makes its nutrients more bioavailable and introduces a wealth of probiotics.
Frequently Asked Questions (FAQ)
Here are answers to some common questions about making sauerkraut:
Q1: How much salt should I use?
A1: A general rule of thumb is 2-3 tablespoons of non-iodized salt per 5 pounds (about 2.2 kg) of cabbage. You can adjust slightly based on your preference, but staying within this range ensures proper fermentation.
Q2: What if my sauerkraut doesn’t have enough brine?
A2: If, after massaging, you don’t have enough liquid to cover the cabbage, you can make a simple brine by dissolving 1 teaspoon of non-iodized salt in 1 cup of non-chlorinated water. Add this sparingly only if needed to ensure the cabbage is fully submerged.
Q3: Can I use iodized salt?
A3: No, it’s best to use non-iodized salt like pickling salt, sea salt, or Himalayan pink salt. Iodine can interfere with the beneficial bacteria responsible for fermentation.
Q4: How long does homemade sauerkraut last?
A4: Stored properly in the refrigerator, homemade sauerkraut can last for several months, often up to 6 months or even longer. Its flavor may continue to develop and intensify over time.
Q5: What is kahm yeast?
A5: Kahm yeast is a harmless, white, film-like growth that can sometimes appear on the surface of fermented foods. It’s a type of yeast that thrives in oxygen-rich environments. You can typically skim it off with a spoon; it doesn’t usually indicate spoilage if it’s just a thin white layer.
Q6: Is it safe to eat if there’s a little white film on top?
A6: If the white film is thin and looks like a skin (kahm yeast), it’s usually safe to skim off and continue fermenting. However, if you see any fuzzy, colored mold (blue, green, black, or pink), it’s best to discard the entire batch to ensure safety.
Q7: Why is my sauerkraut mushy?
A7: Mushy sauerkraut can be caused by fermenting at too high a temperature, using too little salt, or processing the cabbage too finely. Ensure you’re using the correct salt ratio, fermenting in a cool environment, and shredding the cabbage to an appropriate thickness.
Q8: Can I make sauerkraut without a crock?
A8: Yes, you can make sauerkraut in other food-grade containers like large glass jars (mason jars are popular) or food-grade plastic containers. The key principles of keeping the cabbage submerged in brine and maintaining an anaerobic environment still apply. You might need to adapt how you apply weight and cover the container.
Making your own sauerkraut in a crock is a rewarding experience, connecting you to ancient food preservation techniques and providing you with a delicious, healthy, and probiotic-rich food. Enjoy the journey of kraut making!