
Can I set up a Network Attached Storage (NAS) server at home? Yes, you absolutely can! Setting up a NAS server at home allows you to create a centralized hub for your digital life, acting as a powerful file sharing server, a robust home data backup solution, and even a sophisticated home media server. Whether you want to stream movies, store photos, or simply ensure your important files are safe, a DIY NAS build offers a flexible and cost-effective way to achieve these goals. This comprehensive NAS installation guide will walk you through every step, from choosing your hardware to optimizing your NAS configuration.
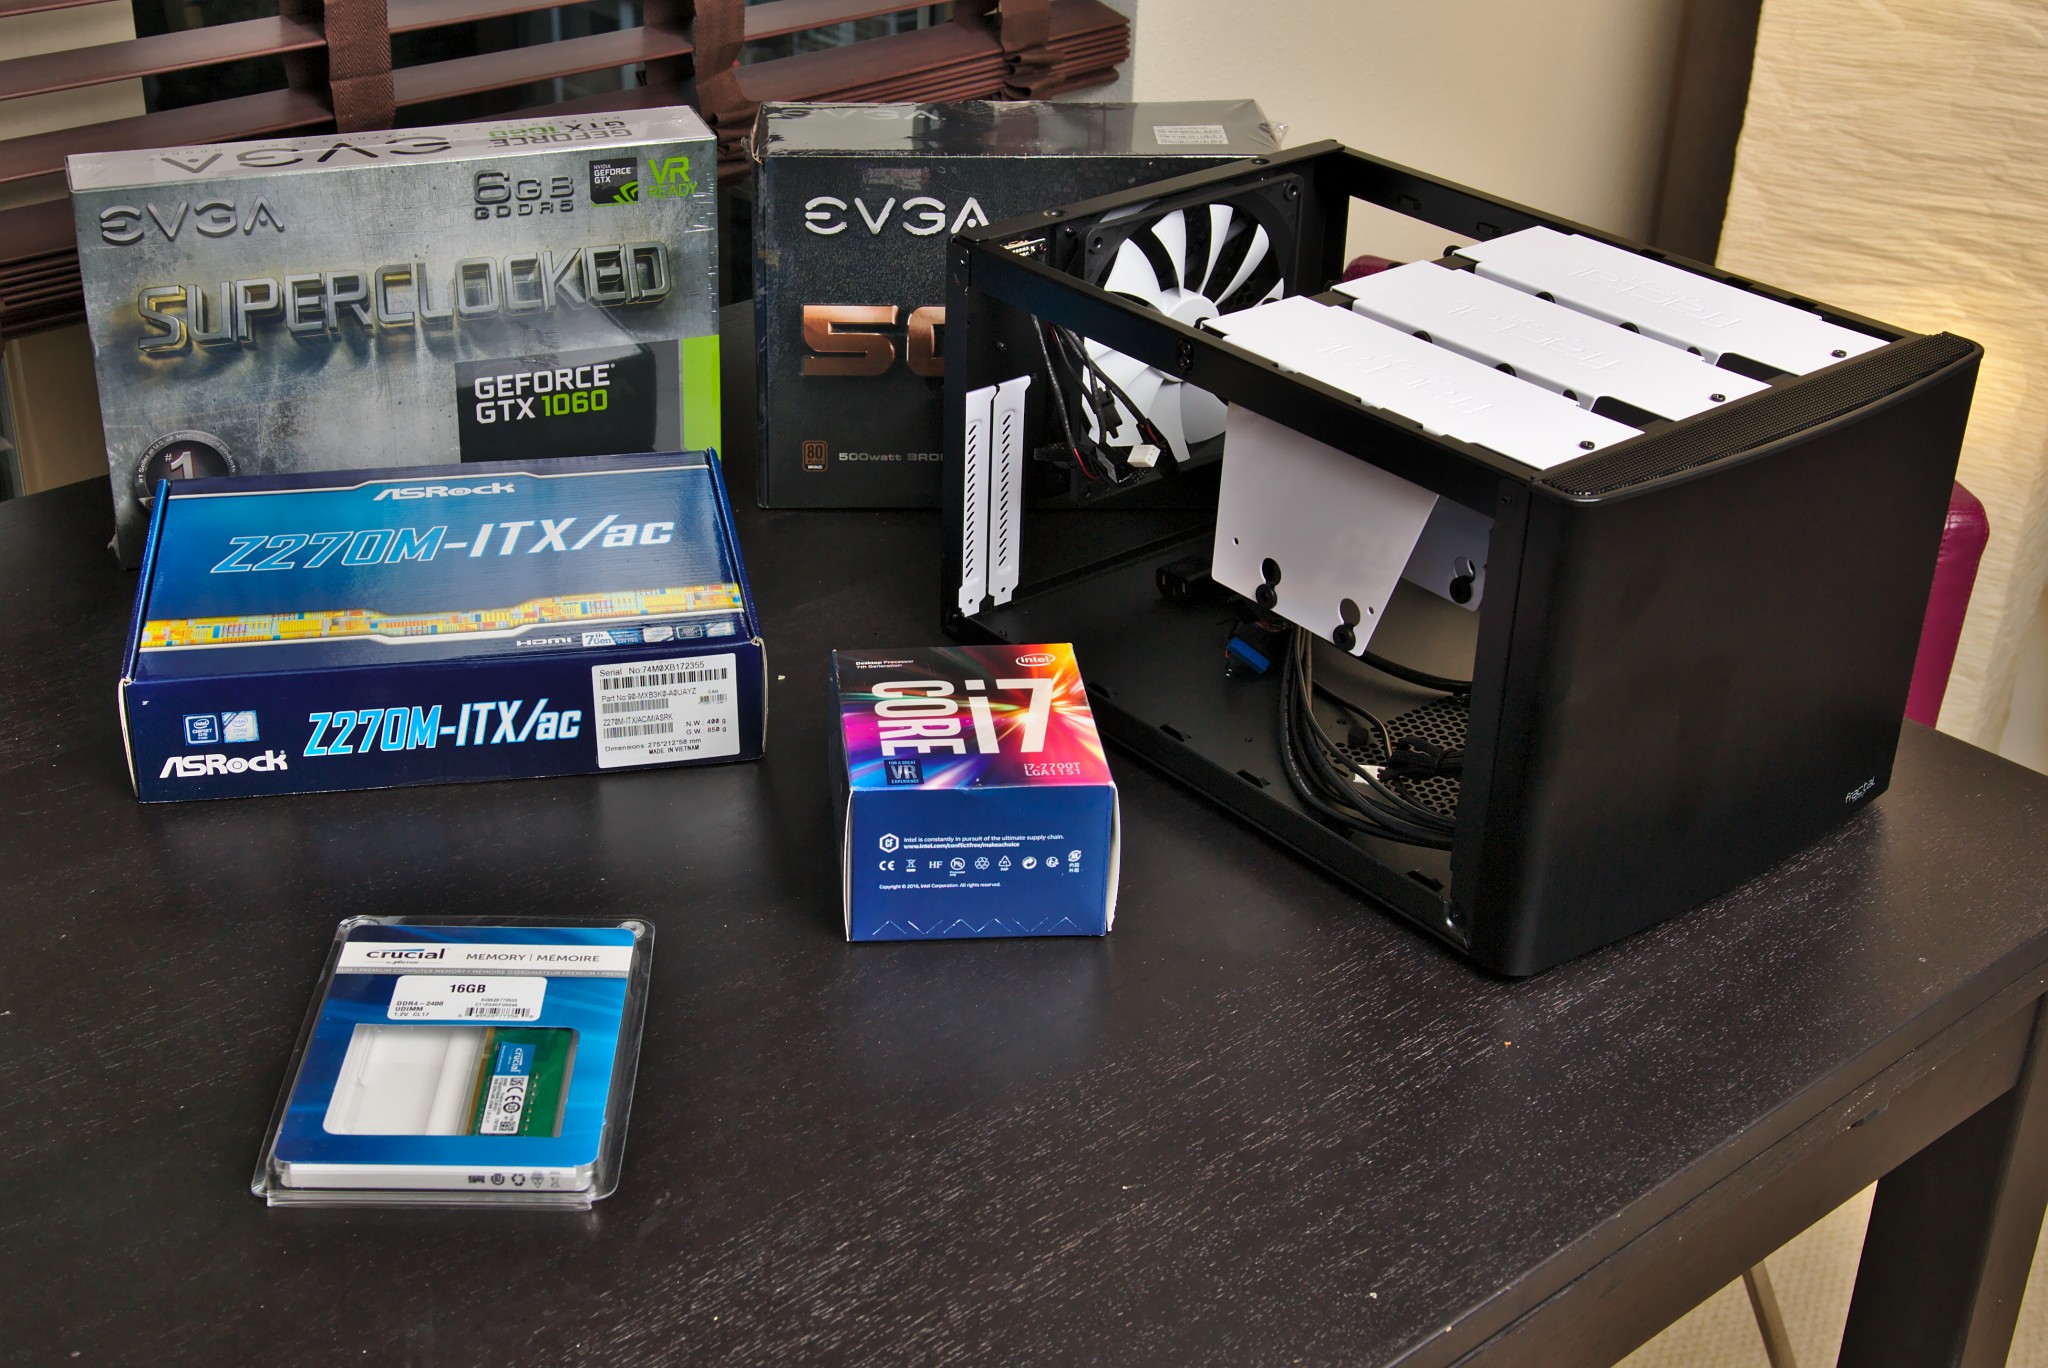
Image Source: partofthething.com
What is a NAS Server and Why You Need One
A Network Attached Storage (NAS) device is a specialized storage device that connects to your home network. Think of it as a dedicated computer for storing and sharing files. Unlike simply plugging an external hard drive into your computer, a NAS is always on and accessible from any device on your network – your computers, smartphones, tablets, and smart TVs.
Here’s why setting up a NAS at home is a game-changer:
- Centralized Storage: All your photos, videos, music, documents, and other important files can be stored in one place, easily accessible from anywhere in your home.
- Home Data Backup: It’s the perfect solution for backing up all your devices. You can schedule automatic backups, ensuring your precious memories and critical work files are always protected.
- Home Media Server: With a NAS, you can transform your home into a media paradise. Stream your entire movie or music collection to any device without needing to copy files. Software like Plex or Emby makes this incredibly easy.
- File Sharing Server: Share files with family members or even grant access to trusted friends remotely.
- Remote Access: Many NAS devices allow you to securely access your files from outside your home network, like when you’re on vacation or at work.
- Data Redundancy (RAID): Most NAS setups support RAID (Redundant Array of Independent Disks), which can protect your data from a single hard drive failure.
Choosing Your NAS Path: Pre-built vs. DIY NAS Build
You have two main routes for setting up your home NAS: buying a pre-built NAS device or building your own. Each has its pros and cons.
Pre-built NAS Devices
Companies like Synology, QNAP, and Western Digital offer all-in-one NAS solutions.
Pros:
- Ease of Use: They come with user-friendly operating systems and straightforward setup processes.
- Integrated Software: Often include feature-rich applications for media streaming, backups, and cloud syncing.
- Compact and Quiet: Designed to be aesthetically pleasing and operate with minimal noise.
- Dedicated Support: Benefit from manufacturer support and warranties.
Cons:
- Higher Cost: Generally more expensive than a DIY solution for comparable performance.
- Limited Customization: Hardware and software options are restricted by the manufacturer.
- Potential Vendor Lock-in: You are tied to the manufacturer’s ecosystem.
DIY NAS Build
This involves buying individual computer components and assembling them yourself.
Pros:
- Cost-Effectiveness: You can often build a more powerful NAS for less money.
- Ultimate Customization: Choose every component to fit your specific needs and budget.
- Scalability: Easily upgrade components or add more storage as needed.
- Flexibility in Software: Install your preferred NAS operating system (e.g., TrueNAS, UnRAID, OpenMediaVault).
Cons:
- Requires Technical Skill: You need some comfort with hardware assembly and software installation.
- More Time-Consuming: The setup and configuration can take longer.
- No Single Point of Support: You’ll need to rely on community forums or individual component manufacturers for support.
- Power Consumption/Noise: Depending on components, it might consume more power or be louder than a pre-built unit.
For this guide, we’ll focus on the DIY NAS build as it offers the most learning opportunities and flexibility.
Step 1: Planning Your NAS Storage Solutions
Before buying anything, consider your needs. This will dictate the hardware you select and the NAS configuration you aim for.
Key Considerations:
- Storage Capacity: How much data do you have now, and how much do you expect to accumulate? Factor in future growth for photos, videos, and backups.
- Performance: Do you need blazing-fast speeds for editing video directly from the NAS, or is everyday file access and media streaming sufficient?
- Data Redundancy: How critical is your data? Do you want protection against hard drive failure? This leads to RAID.
- Power Consumption: Will the NAS run 24/7? Lower power components can save on electricity bills.
- Noise Levels: Where will the NAS be located? If it’s in a living area, quiet components are essential.
- Budget: How much are you willing to spend? This will influence your component choices.
- Future-Proofing: Do you want the ability to add more drives or upgrade components later?
Understanding RAID: Essential for NAS Reliability
RAID is a technology that combines multiple physical disk drives into one or more logical units for data redundancy, performance improvement, or both. For a home NAS, data redundancy is often the primary goal.
Here are common RAID levels suitable for home use:
| RAID Level | Description | Pros | Cons | Minimum Drives |
|---|---|---|---|---|
| RAID 0 | Data is striped across drives. No redundancy. | Faster read/write speeds. Uses full capacity of all drives. | No fault tolerance. If one drive fails, all data is lost. | 2 |
| RAID 1 | Data is mirrored across two drives. | Excellent fault tolerance. If one drive fails, data is safe. | Half of total storage capacity is used for mirroring. Slower write speeds. | 2 |
| RAID 5 | Data and parity information are striped across drives. Parity allows for reconstruction of data if one drive fails. | Good balance of performance, capacity, and fault tolerance. | Slower write speeds due to parity calculation. Rebuild times can be long. Only tolerates one drive failure. | 3 |
| RAID 6 | Similar to RAID 5 but uses dual parity, allowing for two drive failures. | Higher fault tolerance than RAID 5. | Slower write speeds than RAID 5. Lower usable capacity than RAID 5. Rebuild times can be very long. | 4 |
| RAID 10 (1+0) | Combines mirroring (RAID 1) and striping (RAID 0). Data is mirrored, then striped across those mirrored pairs. | High performance and excellent fault tolerance. Tolerates multiple drive failures if they are in different pairs. | Significant storage overhead (50% capacity lost to mirroring). | 4 |
For most home users seeking a balance of storage and protection, RAID 1 (if you have only two drives) or RAID 5 (with three or more drives) are popular choices. A RAID array configuration is crucial for data safety.
Step 2: Gathering Your DIY NAS Components
You can often repurpose an old computer, but building a dedicated NAS from scratch gives you more control over efficiency and reliability.
Essential Hardware:
-
Case:
- Choose a case that can accommodate your desired number of hard drives.
- Consider factor: Tower cases are common, but rackmount cases are available if you have a server rack.
- Look for good airflow to keep drives cool.
-
Motherboard:
- Ensure it has enough SATA ports for your planned drives (or choose a board with plenty, or plan for a SATA expansion card).
- Consider integrated graphics if you plan to use the NAS as a media server with direct playback (though often not necessary for headless NAS).
- Support for ECC (Error-Correcting Code) RAM is a plus for data integrity but adds cost.
-
CPU (Processor):
- For basic file serving and media streaming (like Plex), an older or lower-power CPU is often sufficient (e.g., Intel Celeron, Pentium, or Core i3).
- If you plan to run many services, virtual machines, or multiple Plex streams simultaneously, a more powerful CPU (Core i5 or higher) might be beneficial.
-
RAM (Memory):
- NAS operating systems can be memory-intensive, especially with features like caching or virtualization.
- A minimum of 8GB is recommended. 16GB or more is ideal for smoother performance, especially with ZFS file systems (used by TrueNAS) or if you plan to run multiple applications.
-
Storage Drives (HDDs/SSDs):
- HDDs (Hard Disk Drives): For bulk storage, choose drives designed for NAS use (e.g., Western Digital Red, Seagate IronWolf). These are built for 24/7 operation, vibration tolerance, and have higher reliability.
- SSDs (Solid State Drives): Can be used for the operating system or cache to speed up access to frequently used files.
- Capacity: Buy drives that are the same size and ideally the same model for best RAID performance and compatibility.
-
Power Supply Unit (PSU):
- Choose a reliable PSU with enough wattage to power all your components, including your drives.
- Consider an 80 Plus Bronze or Gold certification for better efficiency and lower power consumption.
- Modular PSUs can help with cable management in the case.
-
Network Interface Card (NIC):
- Most motherboards have a Gigabit Ethernet port. For faster file transfers, consider a 2.5GbE, 5GbE, or 10GbE NIC if your network infrastructure supports it.
-
Optional Components:
- SATA Expansion Card: If your motherboard doesn’t have enough SATA ports.
- CPU Cooler: If the stock cooler is too noisy or insufficient.
- Case Fans: For better airflow.
- Boot Drive (SSD): A small SSD to install the NAS operating system on, keeping your data drives separate.
Example Component Configuration (Mid-Range DIY NAS):
| Component | Recommendation | Notes |
|---|---|---|
| Case | Fractal Design Node 804, Cooler Master HAF XB EVO, or a used server chassis | Prioritize drive bays and airflow. |
| Motherboard | Gigabyte B660M DS3H AX DDR4, ASRock B550M Pro4 | Look for at least 4-6 SATA ports. |
| CPU | Intel Core i3-10100, AMD Ryzen 3 3200G | A basic CPU is usually enough. Integrated graphics are handy during setup. |
| RAM | 16GB DDR4 (2x8GB) | Crucial for smooth operation, especially with ZFS or multiple services. |
| Boot Drive | 250GB Samsung 860 EVO SSD | For OS and applications. Keeps OS separate from data. |
| Data Drives | 2x or 4x Western Digital Red Plus 4TB (or larger, depending on needs) | NAS-specific drives are recommended for reliability. Match capacities. |
| PSU | Corsair CX550M (550W Bronze Semi-Modular) | Enough power for multiple drives and components. |
| NIC | Integrated Gigabit Ethernet (or 2.5GbE if supported and desired) | Ensure it’s compatible with your chosen OS. |
| Optional | Noctua NH-L9i CPU Cooler, extra case fans | For quiet operation and better cooling. |
Step 3: Assembling Your Hardware
This is like building any other computer. Take your time and follow best practices.
- Prepare the Case: Open the case and install standoffs for the motherboard if they aren’t pre-installed.
- Install the CPU: Carefully place the CPU into its socket on the motherboard, aligning the triangle or notch. Secure the retention arm.
- Install the CPU Cooler: Apply thermal paste to the CPU if it’s not pre-applied to the cooler, then attach the cooler according to its instructions.
- Install RAM: Open the clips on the RAM slots and push the RAM modules firmly into place until the clips snap shut.
- Mount the Motherboard: Carefully align the motherboard with the standoffs and screw it into place.
- Install Boot Drive (SSD): Mount your SSD in a drive bay or dedicated slot and connect it to a SATA port on the motherboard and to the PSU.
- Install Data Drives (HDDs): Mount your hard drives in the designated bays. Connect each drive to a SATA port on the motherboard and to the PSU.
- Install PSU: Mount the power supply unit in its bay and connect the necessary cables to the motherboard, boot drive, and data drives.
- Connect Case Cables: Connect the front panel connectors (power button, USB ports, audio) to the motherboard. Refer to your motherboard manual.
- Cable Management: Tidy up the cables using zip ties or Velcro straps for better airflow and a cleaner build.
- Final Check: Double-check all connections. Ensure no loose screws are rattling around.
Step 4: Choosing and Installing NAS Operating System Software
This is where your hardware becomes a functional NAS. There are several excellent open-source and proprietary NAS operating systems.
Popular NAS Operating Systems:
- TrueNAS CORE (formerly FreeNAS): Based on FreeBSD, it’s known for its robust ZFS file system, excellent data integrity features, and powerful enterprise-level capabilities. It’s a fantastic choice for data protection and advanced users.
- TrueNAS SCALE: A Linux-based version of TrueNAS, offering broader application support (Docker, Kubernetes) and better hardware compatibility for certain components.
- UnRAID: A popular commercial option that uses a proprietary approach to storage pooling. It excels at mixed drive sizes and allows for easy expansion. It also has a strong focus on media server applications and Docker containers.
- OpenMediaVault (OMV): A Debian Linux-based NAS solution. It’s user-friendly, highly extensible with plugins, and a great choice for beginners and those who want a straightforward NAS experience.
For this guide, we’ll outline a general installation process, often similar across many OSes. We’ll use TrueNAS CORE as an example due to its powerful features and open-source nature, making it a great platform for exploring RAID array configuration and NAS storage solutions.
Installation Steps (TrueNAS CORE Example):
- Download TrueNAS CORE: Go to the official TrueNAS website and download the latest ISO image for TrueNAS CORE.
- Create a Bootable USB Drive:
- You’ll need software like Rufus (Windows) or BalenaEtcher (Windows, macOS, Linux).
- Insert your USB drive (at least 8GB).
- Open Rufus/Etcher, select the TrueNAS ISO file, and select your USB drive.
- Warning: Ensure you select the correct USB drive, as the process will erase all data on it.
- Start the creation process.
- Configure BIOS/UEFI:
- Insert the bootable USB drive into your NAS build.
- Power on the NAS and immediately press the key to enter the BIOS/UEFI setup (usually Delete, F2, F10, or F12).
- Change the boot order to prioritize the USB drive.
- If your motherboard supports it, disable Secure Boot.
- Save changes and exit BIOS.
- Boot from USB and Install:
- The NAS will boot from the USB drive, and you’ll see the TrueNAS installer.
- Select “Install” or “Upgrade.” Choose “Install.”
- Select your boot drive (the small SSD you prepared). Do not select your data drives for installation.
- The installer will partition the drive and install TrueNAS. This takes some time.
- When prompted, remove the USB drive and reboot the NAS.
- Initial Boot and IP Configuration:
- After rebooting, TrueNAS will start. It will prompt you to configure networking.
- You can set a static IP address for your NAS. It’s best to do this so its IP never changes. Note down this IP address.
- You’ll typically see an IP address displayed on the console, like
http://192.168.1.X.
Step 5: Accessing and Configuring Your NAS
Now that the OS is installed, you’ll manage your NAS through its web interface.
- Access the Web Interface: Open a web browser on another computer on your network and type in the IP address of your NAS (e.g.,
http://192.168.1.100). - Login: The default username is usually
rootand the password isfreenas(for TrueNAS CORE) or what you set during installation. - Create Storage Pools:
- Navigate to Storage > Pools.
- Click Add or Create Pool.
- Choose RAID Type: This is where your RAID array configuration happens. TrueNAS uses the term “vdevs” (virtual devices) for RAID configurations.
- Stripe (RAID 0): Not recommended for data.
- Mirror (RAID 1): Select two drives and choose “Mirror.”
- RAIDZ1 (RAID 5): Select three or more drives and choose “RAIDZ.”
- RAIDZ2 (RAID 6): Select four or more drives and choose “RAIDZ2.”
- RAIDZ3 (RAID 7): Select five or more drives and choose “RAIDZ3.”
- Select Drives: Choose your data drives to be part of the pool.
- Create Pool: Give your pool a name (e.g.,
tank,media_storage). Click “Create.” - Warning: This process will erase all data on the selected drives.
- Create Datasets:
- Within your storage pool, you create “datasets.” These are like folders but with more advanced options for permissions, snapshots, and quotas.
- Go to Storage > Pools, click the gear icon next to your pool, and select “Add Dataset.”
- Name your dataset (e.g.,
media,documents,backups).
- Configure Network Shares (SMB/CIFS for Windows, NFS for Linux/macOS):
- Go to Sharing > Windows Shares (SMB).
- Click Add.
- Path: Browse to the dataset you created (e.g.,
/mnt/tank/media). - Name: Give the share a name (e.g.,
Media). - Enable: Make sure SMB is enabled.
- Configure advanced options like Guest Access if needed.
- Click Save.
- User Management:
- Go to Accounts > Users.
- Click Add to create users who can access shares. Assign them to the
usersgroup. - Go to Accounts > Groups to manage groups if needed.
- Enable Services:
- Go to Services.
- Find SMB and click the “Start Automatically” button and then the “Play” button to start the service.
- You can enable other services like NFS, FTP, SSH, etc., here.
Step 6: Setting Up Your Home Media Server (Plex Server Setup)
One of the most popular uses for a NAS is to run a home media server. Plex is an excellent choice for this.
Plex Server Setup on TrueNAS:
TrueNAS CORE primarily uses Jails (a FreeBSD feature) or passing through a VM to run applications like Plex. TrueNAS SCALE uses Docker containers, which is generally simpler for Plex. We’ll briefly touch on both.
Using Jails (TrueNAS CORE)
- Create a Jail:
- Go to Jails > Add Jail.
- Give it a name (e.g.,
plex). - Select the TrueNAS Release.
- Choose IPv4 as DHCP or set a static IP for the jail.
- Click Save.
- Install Plex Media Server inside the Jail:
- Once the jail is created, click the “Shell” icon next to it.
- In the jail’s shell, you’ll typically download the Plex Media Server package for FreeBSD.
- You might need to install
wgetorcurlfirst:pkg install wget. - Download the Plex installer:
wget <URL to Plex FreeBSD package>. - Install the package:
pkg install ./plexmediaserver-*.pkg. - Start the Plex service:
service plexmediaserver start.
- Access Plex Web Interface:
- Open your browser and go to
http://<IP_of_Jail>:32400/web. - Log in to Plex (or create an account) and follow the setup wizard.
- Add your media libraries, pointing them to the shared datasets on your NAS. You’ll need to configure share access from the jail to your datasets.
- Open your browser and go to
Using Docker/Apps (TrueNAS SCALE)
TrueNAS SCALE makes running Plex much simpler via its Application catalog.
- Enable App Services: Go to Apps > Configure.
- Add TrueCharts or Plex Catalog: If not already present, add a catalog like TrueCharts.org.
- Find Plex: Navigate to Apps, search for “Plex Media Server,” and click “Install.”
- Configure Plex:
- Give the app a name.
- Choose a dataset for its configuration.
- Crucially, map your media datasets as volumes to the Plex container (e.g., map
/mnt/tank/mediato/data/moviesinside the container). - Configure network ports.
- Click Install.
- Access Plex Web Interface: Go to
http://<IP_of_TrueNAS_SCALE_Node>:32400/web.
Step 7: Implementing Home Data Backup Strategies
A NAS is a perfect central point for home data backup.
Backup Methods:
- NAS to External Drive/Cloud: Use the NAS’s built-in backup tools to back up critical data from the NAS to an external USB drive or a cloud storage service (like Backblaze B2, Amazon S3, Google Drive, Dropbox).
- Computers to NAS:
- Windows: Use File History or Windows Backup and Restore. Point it to your SMB shares.
- macOS: Use Time Machine. You’ll need to configure your NAS to support Time Machine backups via SMB.
- Linux: Use
rsync,borgbackup, or dedicated backup tools.
- NAS-to-NAS Backup: If you have a second NAS (at a friend’s house or a remote location), you can configure synchronization for offsite backups.
TrueNAS Backup Tools:
- Replication Tasks: Use the Replication Tasks feature in TrueNAS to replicate datasets to another TrueNAS system or a remote server using SSH. This is excellent for offsite backups.
- Rsync Tasks: Configure Rsync tasks to pull or push data from/to remote servers or local devices.
Step 8: Ongoing Maintenance and Monitoring
Your NAS is a living system that requires some care.
- Check Drive Health: Regularly monitor the health of your hard drives through SMART (Self-Monitoring, Analysis, and Reporting Technology) status in your NAS interface.
- Update Software: Keep your NAS operating system and any installed applications updated to patch security vulnerabilities and get new features.
- Monitor Storage Usage: Keep an eye on your available space to avoid running out.
- Test Backups: Periodically test your backups to ensure they are working correctly and you can restore data if needed.
- Power Outages: Consider a UPS (Uninterruptible Power Supply) to protect your NAS from sudden power loss, which can corrupt data.
Frequently Asked Questions (FAQ)
Q1: Can I use regular desktop hard drives in a NAS?
A1: Yes, you can, but NAS-specific drives (like WD Red or Seagate IronWolf) are designed for 24/7 operation, vibration resistance, and have firmware optimized for RAID arrays, leading to better reliability.
Q2: What is the best RAID level for a home NAS?
A2: For most home users, RAID 1 (mirroring) with two drives, or RAID 5 (RAIDZ1 in TrueNAS) with three or more drives, offers a good balance of performance, usable capacity, and data protection against a single drive failure.
Q3: How do I access my NAS files from outside my home network?
A3: Most NAS systems offer secure remote access features. This typically involves setting up a VPN server on your NAS or router, or using the NAS manufacturer’s proprietary remote access service (like Synology QuickConnect or QNAP myQNAPcloud). Be sure to secure these access methods.
Q4: Can I run virtual machines on my NAS?
A4: Yes, systems like TrueNAS (especially SCALE) and UnRAID support running virtual machines, allowing you to host other operating systems or services directly on your NAS hardware.
Q5: Do I need a separate boot drive for my NAS OS?
A5: It’s highly recommended. Installing the OS on a small SSD separate from your main data drives prevents data corruption if the OS drive fails and can also improve overall system responsiveness.
Q6: Is a NAS worth the cost and effort compared to external drives?
A6: For centralized storage, reliable backups, and media streaming, a NAS offers significant advantages over multiple external drives. The convenience, features, and data protection capabilities often justify the investment for those with a growing digital library.
Setting up a NAS server at home is a rewarding project that gives you unparalleled control over your data. By carefully planning your NAS storage solutions, selecting appropriate hardware for your DIY NAS build, and following this NAS installation guide, you can create a powerful file sharing server, a reliable home data backup system, and a fantastic home media server capable of running your Plex server setup with ease. Remember to pay close attention to your RAID array configuration for optimal data safety. Enjoy your centralized digital life!