
How To Home Can Tuna: Fresh Flavor for Weeks
Can you home can tuna? Yes, you absolutely can home can tuna, and it’s a fantastic way to enjoy delicious, high-quality seafood whenever you want. This guide will walk you through the entire process of canning tuna at home, ensuring you achieve safe and flavorful results. Preserving seafood through canning is an age-old practice that brings the bounty of the ocean right to your pantry.
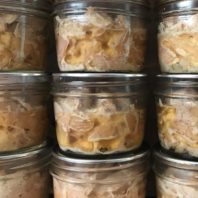
Image Source: wpcdn.web.wsu.edu
The Allure of Home-Canned Tuna
Imagine opening a jar of your own home-canned tuna, bursting with fresh flavor, ready to be transformed into a gourmet sandwich, a savory salad, or a simple, healthy snack. Canning tuna at home allows you to control the quality of the fish, the packing medium (oil, water, or brine), and the absence of any unwanted additives. It’s a truly rewarding experience that connects you directly to your food source. Beyond tuna, this knowledge can extend to other fish like canning salmon, canning mackerel, or canning sardines, offering a versatile skill for preserving various types of oily fish.
Why Choose Home Canning?
The benefits of canning tuna at home are numerous:
- Superior Flavor: Home-canned tuna often tastes far superior to commercially canned varieties. You get to select the freshest fish and pack it according to your preference.
- Cost-Effectiveness: When you have access to good quality, fresh tuna, home canning can be significantly more economical than buying premium canned tuna.
- Control Over Ingredients: You decide exactly what goes into your jars. No unnecessary preservatives, fillers, or excess salt.
- Sustainability: Canning reduces food waste by preserving catches that might otherwise spoil, and it lessens your reliance on industrially processed foods.
- Pantry Stockpiling: A well-stocked pantry is a secure pantry. Home-canned tuna provides a valuable protein source that lasts for a long time.
Deciphering the Canning Process: What You Need to Know
Before you dive into canning tuna at home, it’s crucial to grasp the fundamentals of safe home canning. This isn’t about water bath canning; tuna, being a low-acid food, requires a different, more robust method to ensure safety.
The Non-Negotiable: Pressure Canning Tuna
For any type of meat or low-acid food, including tuna, the only safe canning method is pressure canning tuna. This is because the high temperatures achieved in a pressure canner (240°F or 116°C) are necessary to destroy Clostridium botulinum spores, the bacteria that cause botulism, a potentially deadly illness.
Why Water Bath Canning Won’t Work for Tuna:
Water bath canning, which uses boiling water (212°F or 100°C), is only effective for high-acid foods like fruits, pickles, and jams. It does not reach the internal temperature required to kill botulism spores in low-acid foods. Attempting to use water bath canning for tuna or other seafood is not safe home canning.
Essential Equipment for Canning Tuna at Home
To embark on this culinary adventure, you’ll need some specialized equipment:
- Pressure Canner: This is the most critical piece of equipment. Ensure it is in good working order, with a functioning pressure gauge or weight. There are two main types:
- Dial Gauge Canners: These have a gauge that measures pressure. They need to be calibrated annually.
- Weighted Gauge Canners: These use weights that vent steam at specific pressures (e.g., 10 or 15 pounds per square inch – PSI). They are generally considered more reliable as they don’t require calibration.
- Mason Jars: Use only high-quality Mason jars specifically designed for canning. Ensure they are free from chips or cracks. Pint or half-pint jars are ideal for tuna.
- New Lids and Bands: Always use new canning lids for each batch. Bands can be reused if they are not rusted or bent.
- Jar Lifter: Essential for safely moving hot jars into and out of the canner.
- Canning Funnel: A wide-mouth funnel makes filling jars easier and cleaner.
- Bubble Remover/Headspace Tool: A non-metallic tool (like a plastic spatula or chopstick) to remove air bubbles and measure headspace.
- Clean Cloths: For wiping jar rims.
- Large Stockpot or Bowl: For cleaning and preparing the fish.
- Sharp Knives: For filleting and cutting the tuna.
- Optional: A fish scaler if the skin is on.
Sourcing Your Tuna: Quality Matters
The success of your home-canned tuna hinges on the quality of the fish you start with.
- Freshness is Key: Use the freshest tuna possible. If you’re fishing yourself, process the fish as soon as possible after catching it. If buying from a market, look for firm, bright flesh with no strong odors.
- Type of Tuna: Most tuna species can be canned. Yellowfin, albacore, bluefin, and skipjack are all popular choices. Albacore is often preferred for its firm texture and milder flavor, similar to premium canned white tuna.
- Avoid Frozen Fish (Generally): While possible, using previously frozen tuna can sometimes result in a softer texture when canned compared to fresh. If you must use frozen, ensure it was frozen quickly after being caught and thawed properly.
Step-by-Step Guide to Canning Tuna at Home
Preserving seafood requires precision and adherence to tested recipes. Here’s how to do it safely and effectively:
Step 1: Preparing the Tuna
- Clean the Fish: If you caught the tuna yourself, clean it immediately. Remove the head, tail, and guts. Rinse thoroughly with cold water.
- Fillet the Tuna: Skin the tuna and remove any dark lateral meat (bloodline), as this can affect flavor and color. Cut the tuna into uniform chunks or strips that will fit easily into your canning jars, leaving about an inch of headspace at the top.
Step 2: Pre-cooking (Optional but Recommended)
While some recipes allow raw packing, pre-cooking the tuna can improve texture and leach out some of the oil, which can lead to a clearer packing liquid and reduce the risk of liquid siphoning during processing.
- Baking: Place tuna chunks on a baking sheet and bake at 250°F (120°C) for about 10-15 minutes, until it’s firm and opaque. Avoid overcooking.
- Steaming: Steam the tuna chunks for about 10-12 minutes until firm.
- Simmering: Gently simmer the tuna in water or brine for about 10 minutes.
Allow the pre-cooked tuna to cool slightly so you can handle it. You can either drain off all the liquid or reserve it for another use.
Step 3: Packing the Jars
- Sterilize Jars: Wash jars, lids, and bands in hot, soapy water. Rinse well. Keep jars hot until ready to fill. You can do this by placing them in a simmering water bath or in a warm oven.
- Pack the Tuna: Pack the tuna chunks or strips firmly into the hot jars, leaving 1 inch of headspace. Do not pack too tightly, as this can prevent proper heat penetration.
- Add Packing Medium (Optional): You can pack tuna dry (with no added liquid), or add a packing medium.
- Oil: Use a good quality olive oil, vegetable oil, or other preferred oil.
- Water: Use boiling water.
- Brine: A light brine made of 1 teaspoon salt per pint jar can also be used.
Pour the chosen medium over the tuna, maintaining the 1-inch headspace.
- Remove Air Bubbles: Use your bubble remover tool to gently run down the sides of the jar, releasing trapped air. Re-check the headspace and add more packing medium if necessary to maintain the 1-inch headspace.
- Wipe Jar Rims: Clean the jar rims thoroughly with a damp cloth. Any food residue can prevent the lid from sealing.
- Place Lids and Bands: Center the new flat lid on each jar. Screw on the bands fingertip tight – just until you feel resistance, then stop. Overtightening can prevent air from escaping during processing, potentially leading to a seal failure.
Step 4: Processing in the Pressure Canner
This is where the critical step of pressure canning tuna occurs. Always follow the specific instructions for your pressure canner model.
- Add Water to Canner: Place the rack in the bottom of your pressure canner. Add the amount of hot water specified by your canner’s manufacturer (usually 2-3 inches).
- Load the Canner: Carefully place the filled jars onto the rack in the canner, ensuring they do not touch each other.
- Secure the Lid: Lock the canner lid securely according to the manufacturer’s instructions. Leave the vent pipe open (or the weighted gauge off).
- Vent the Canner: Turn the heat to high. Allow steam to escape steadily from the vent pipe for 10 minutes. This venting process is crucial to remove air from the canner, ensuring the correct internal temperature is reached.
- Pressurize the Canner: After venting, place the weighted gauge on the vent pipe or close the vent. Allow the canner to build up pressure.
- Process at Correct Pressure:
- For weighted gauge canners, begin timing when the weight starts to jiggle or vent at the recommended pressure (usually 10 or 15 PSI, depending on your altitude).
- For dial gauge canners, begin timing when the gauge reaches the correct pressure for your altitude (11 PSI for altitudes up to 1,000 feet; increase by 1 PSI for every 500 feet above sea level).
- Processing Time: Process pints of tuna for 100 minutes. Half-pints require 90 minutes.
- Maintain Pressure: Monitor the pressure closely and adjust the heat to maintain the correct pressure throughout the processing time. Do not let the pressure drop below the target. If it does, you must bring it back up to pressure and restart the timing from the beginning.
Step 5: Cooling and Checking Seals
- Depressurize Naturally: Once the processing time is complete, turn off the heat. Do not try to open the vent or speed up cooling. Let the canner cool down naturally until the pressure returns to zero. This can take several hours.
- Remove Gauge/Weight: Once the pressure has completely dropped, carefully remove the weighted gauge or open the vent according to your canner’s instructions. Wait another 10 minutes before opening the lid.
- Remove Jars: Using the jar lifter, carefully remove the jars from the canner and place them on a towel-lined counter or cooling rack, leaving space between them.
- Cool Completely: Allow the jars to cool undisturbed for 12-24 hours. You may hear a “ping” sound as the lids seal – this is a good sign!
- Check Seals: After 12-24 hours, check the seals. The lids should be concave (curved downward) and should not flex when pressed. If a lid is loose or popped up, the jar did not seal properly. Refrigerate that jar and use it within a few days, or reprocess it with a new lid and ring (if the contents are still safe and you have time).
- Store Properly: Remove the bands from sealed jars, wipe the jars clean, label them with the contents and date, and store them in a cool, dark, dry place.
Alternative Seafood Canning: Canning Salmon and More
The principles of canning tuna at home are largely applicable to other oily fish.
- Canning Salmon: Similar to tuna, salmon requires pressure canning. You can pack it with or without liquid. The flesh will flake beautifully after processing.
- Canning Mackerel: Mackerel, being an oily fish, benefits from the pressure canning process to ensure safety and a good texture.
- Canning Sardines: While often canned whole, you can also can deboned and skinned sardines, much like tuna chunks, using the same pressure canning method. The key is always to use the correct processing time and pressure for the jar size and type of fish.
Important Safety Considerations for Preserving Seafood
Safe home canning is paramount. Always prioritize safety over shortcuts.
- Follow Tested Recipes: Use recipes from reputable sources like the National Center for Home Food Preservation (NCHFP), University Extension offices, or Ball® Canning. These recipes have been scientifically tested for safety.
- Altitude Adjustments: Pressure requirements change with altitude. Always consult a chart for your specific altitude to ensure you are processing at the correct PSI.
- Jar Inspection: Never use jars with nicks, cracks, or chipped rims.
- Lid Inspection: Always use new lids. Inspect them for any defects before use.
- Headspace: Adhering to the correct headspace is critical for proper sealing and vacuum formation.
- Processing Time: Do not shorten the processing time. This is essential for destroying harmful bacteria.
- Botulism Awareness: Botulism is rare but deadly. It thrives in low-acid, oxygen-free environments. Pressure canning is the only reliable way to prevent it in foods like tuna. If you have any doubt about the safety of a canned product (e.g., bulging lid, off odor, spurting liquid when opened), discard it immediately without tasting.
Frequently Asked Questions (FAQ) about Canning Tuna
Q: Can I can tuna without a pressure canner?
A: No, it is not safe to can tuna using a water bath canner or any other method besides a pressure canner. Tuna is a low-acid food, and only the high temperatures achieved in a pressure canner can destroy Clostridium botulinum spores.
Q: How long will home-canned tuna last?
A: Properly canned tuna stored in a cool, dark place can last for at least one year, and often longer. The quality may gradually decline after a year or two, but it remains safe as long as the seal is intact and there are no signs of spoilage.
Q: Do I have to add oil or water to the jars?
A: No, you can pack tuna dry. Many people prefer to pack it dry for a more concentrated flavor and to control how they prepare it later. If you do add a packing medium, it’s typically for flavor or to achieve a specific texture.
Q: My jars didn’t seal. What should I do?
A: If a jar fails to seal, refrigerate it immediately and use the contents within a few days. You can also reprocess the jar: empty the contents into a clean pot, reheat to simmering, repack into a clean, hot jar with a new lid and band, and reprocess for the full recommended time. Ensure you’re following all the steps correctly, especially regarding headspace and rim cleanliness.
Q: Can I add spices or herbs to my canned tuna?
A: Yes, you can add seasonings like salt, pepper, chili flakes, or herbs. However, always follow tested recipes that include these additions, as some ingredients can affect acidity or processing. For instance, adding large amounts of oil might require slight adjustments in processing. Stick to common seasonings in small quantities for best results.
Q: What is the best jar size for canning tuna?
A: Pint (16 oz) or half-pint (8 oz) jars are most common and recommended for canning tuna. These sizes are practical for single servings or smaller meal preparations.
Q: How do I know if my pressure canner gauge is accurate?
A: Dial gauges should be tested for accuracy annually by your local county extension office or a canning equipment supplier. Weighted gauges do not require calibration but should be checked for blockages in the vent.
Canning tuna at home is a rewarding skill that offers unparalleled freshness and flavor. By diligently following safe canning practices, particularly the necessity of pressure canning tuna, you can fill your pantry with delicious, high-quality seafood, ready to be enjoyed whenever the craving strikes. Happy canning!