
Can I make clear ice at home? Yes, absolutely! Making crystal-clear ice cubes at home is achievable with a few smart techniques. Forget that cloudy, milky ice that dilutes your drinks too quickly. We’re talking about pristine, glass-like cubes that elevate your cocktails and beverages. This guide will walk you through the science and the practical steps to achieve perfectly clear ice every time.
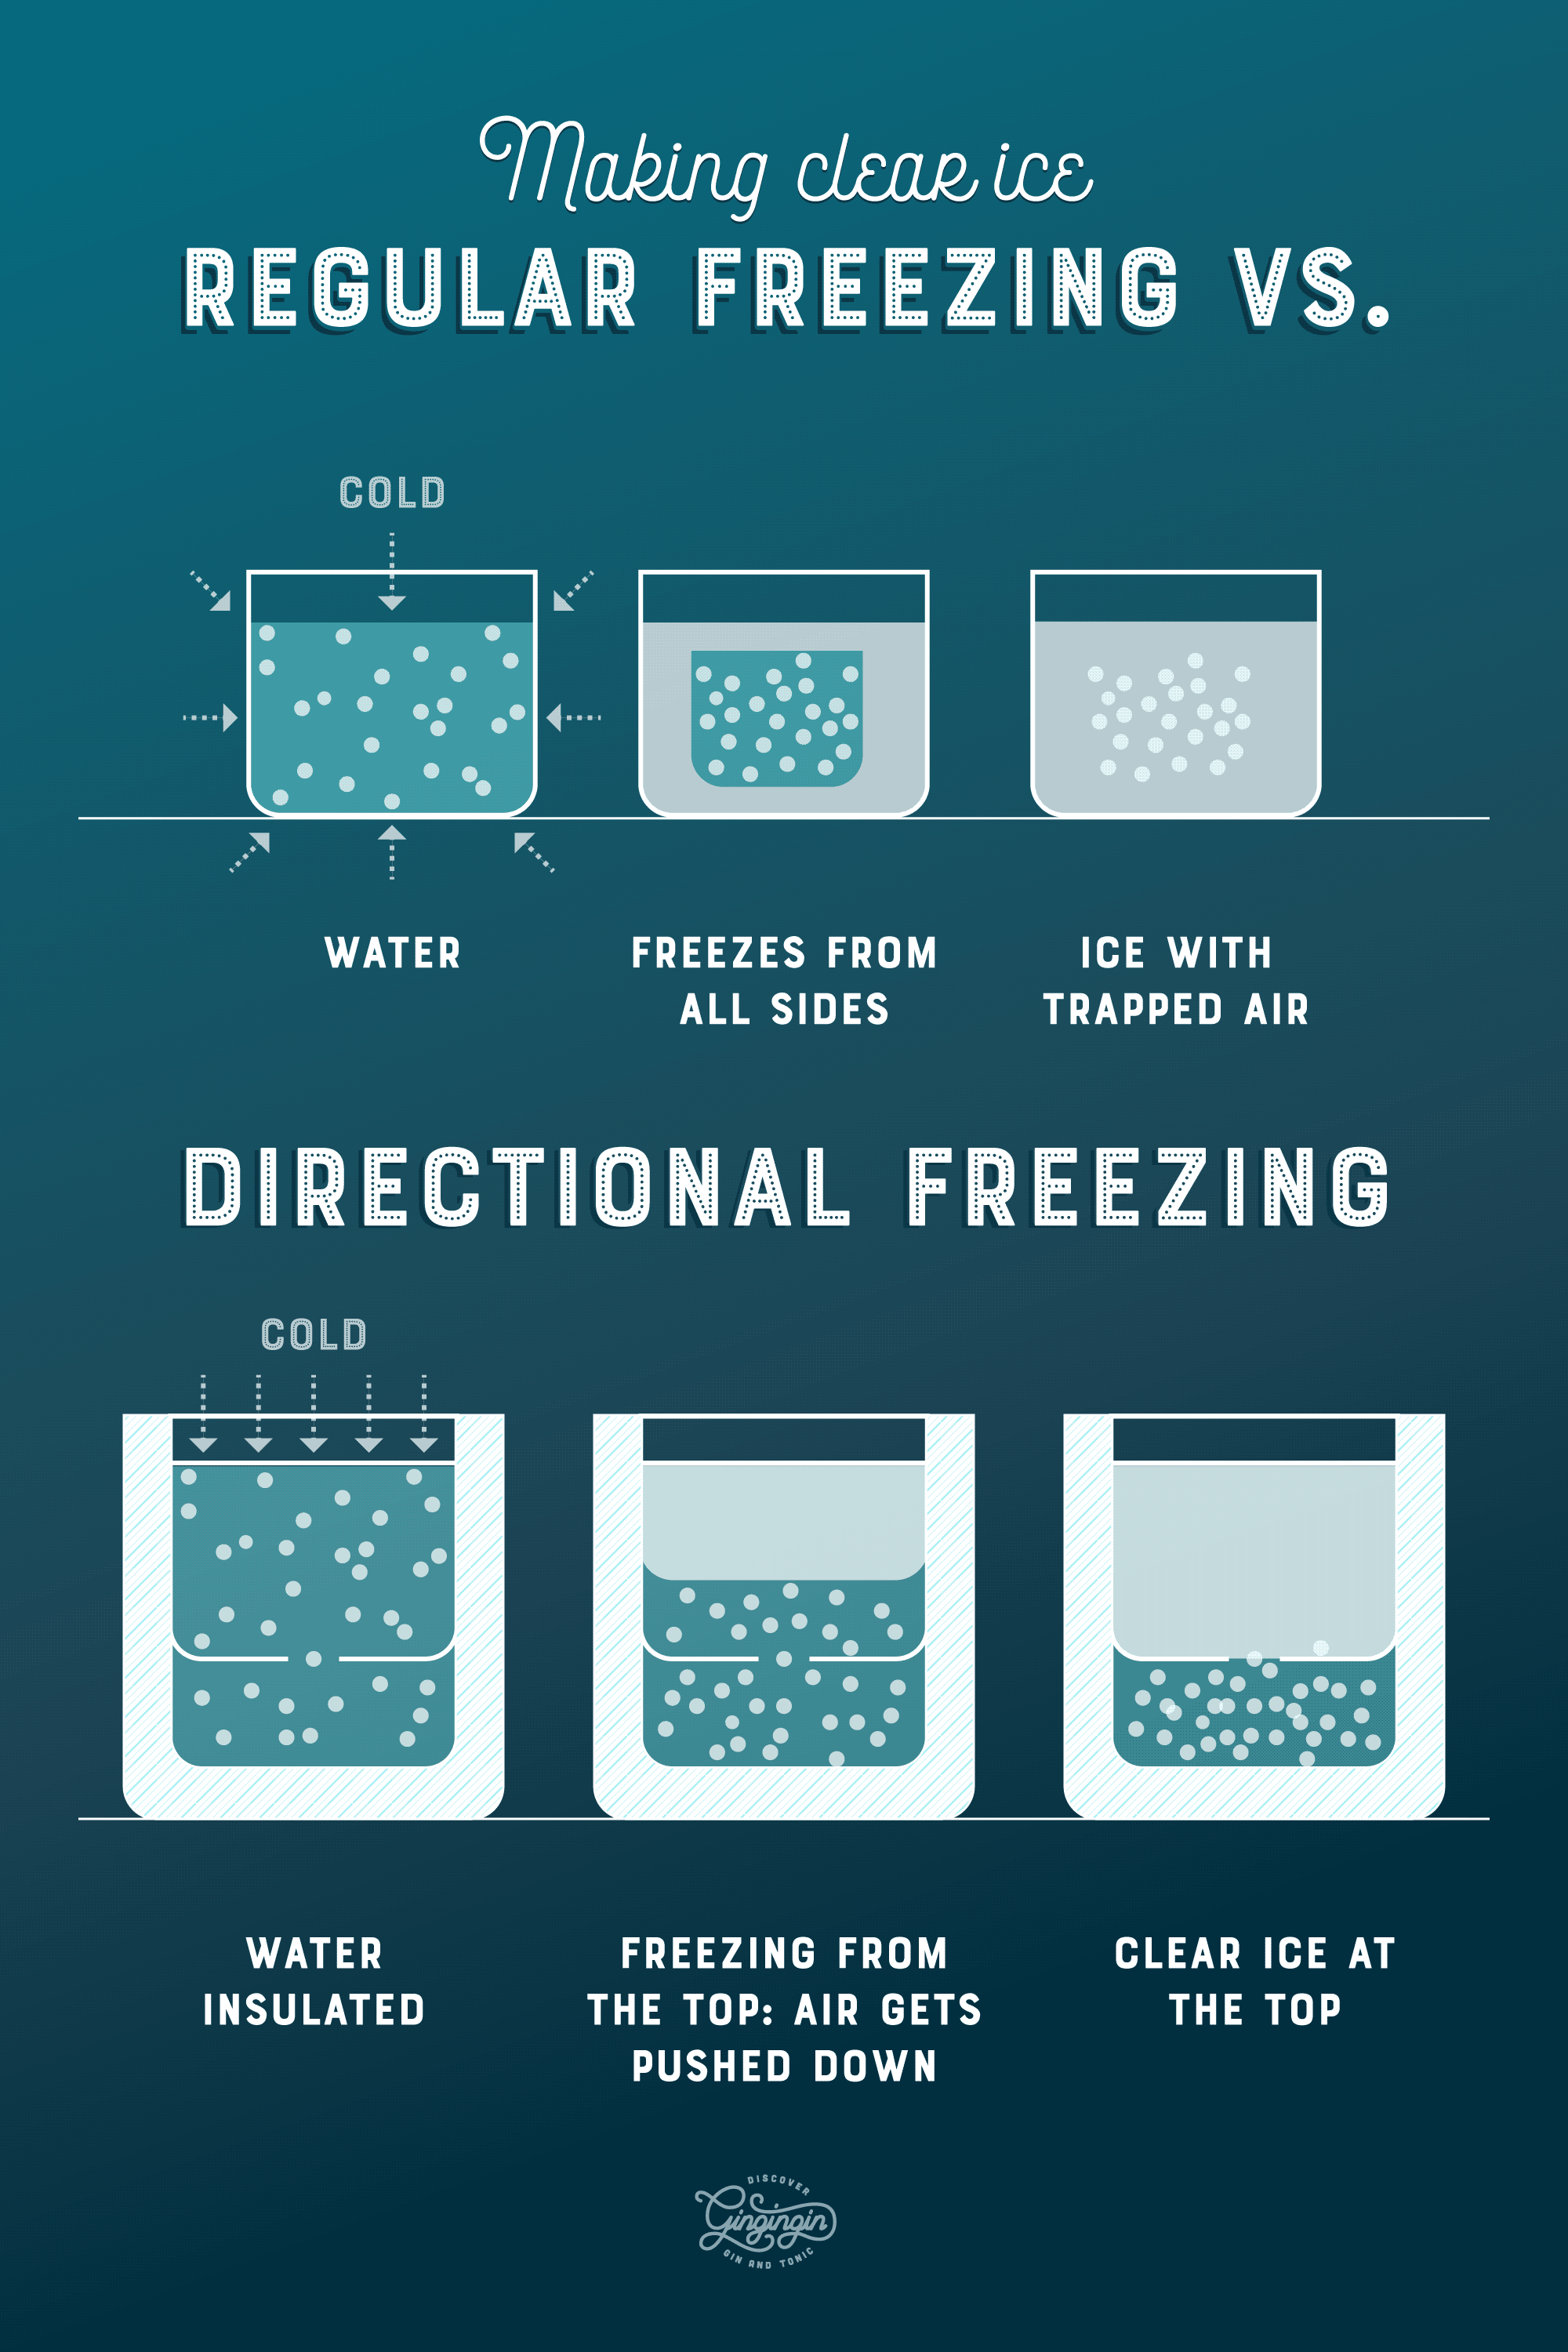
Image Source: liquorlabs.tv
Deciphering the Cloudiness: What Makes Ice Cloudy?
The culprit behind that unappealing cloudy appearance in your homemade ice is trapped air and impurities. When water freezes, it does so from the outside in. Dissolved gases (like oxygen and nitrogen) and mineral impurities in ice (like calcium and magnesium) are pushed towards the center of the ice block as the water freezes. This creates a cloudy, opaque core, which is essentially a pocket of frozen gas and minerals.
The Role of Air Bubbles
Air bubbles are the primary contributors to cloudy ice. As water cools, gases become less soluble. When you freeze water quickly, these dissolved gases don’t have enough time to escape and get trapped within the ice structure, forming tiny bubbles that scatter light, making the ice appear cloudy.
Impurities and Minerals
Beyond air, impurities in ice also play a role. Minerals and other dissolved solids in your tap water, while generally safe to drink, can also affect the clarity of your ice. These impurities tend to concentrate in the last part of the water to freeze, contributing to the cloudy center.
The Science of Clear Ice: Embracing Directional Freezing
The secret to achieving crystal-clear ice lies in a process called directional freezing. This technique essentially forces the water to freeze in one direction, pushing all the impurities and air bubbles to one side, away from the part of the ice you’ll be using.
How Directional Freezing Works
Imagine a block of ice. In a standard freezer, water freezes from all sides simultaneously. This traps air and impurities everywhere. With directional freezing, you create an environment where the water freezes from the top down or bottom up, allowing the trapped gases and impurities to be purged to the bottom or top of the ice block.
Why Slow Freezing is Key
Slow freezing is another crucial element in the directional freezing process. When water freezes slowly, dissolved gases have more time to escape into the surrounding air, rather than getting trapped as bubbles. This gradual freezing process allows impurities to migrate away from the forming ice crystals.
Mastering the Techniques: Step-by-Step Guides
Now that we grasp the “why,” let’s dive into the “how.” Here are proven methods to make clear ice cubes at home.
Method 1: The Cooler Method (The Most Popular)
This is the most widely used and effective method for achieving clear ice at home, relying heavily on directional freezing.
What You’ll Need:
- A small, insulated cooler (like a lunch cooler, typically 6-12 quart capacity). Avoid large, bulky coolers, as they can lead to uneven freezing.
- Your desired ice cube molds (silicone molds work best as they are flexible and allow for easy removal).
- Tap water or filtered water.
- A freezer.
- A serrated knife or a small saw (for separating cubes).
The Process:
- Prepare Your Molds: Fill your silicone ice cube molds with water. Don’t overfill, as the water will expand slightly when it freezes.
- Position the Molds in the Cooler: Place the filled ice cube molds inside the insulated cooler.
- Add Water to the Cooler: Carefully pour water into the cooler, around the ice cube molds, until the molds are fully submerged by about 1-2 inches. This water in the cooler will freeze from the bottom up, driving the freezing process and pushing impurities down.
- The Crucial Step: Place in the Freezer: Put the cooler (with the lids off) into your freezer. It’s important to place it in a location where it won’t be disturbed and has good air circulation.
- Freezing Time: Allow the cooler to freeze for approximately 24-36 hours. The exact time will depend on your freezer’s temperature and the size of your cooler. You want the water in the cooler to be mostly frozen, but the water inside the molds should still be liquid or slushy.
- Extraction: Once the 24-36 hours are up, carefully remove the cooler from the freezer. You’ll likely see a large block of ice on top, with the cloudy, impure water at the very bottom.
- Lift the ice cube molds out of the cooler. You might need to run a little warm water over the bottom of the cooler to loosen the large ice block.
- Discard the cloudy water at the bottom of the cooler.
- Invert the molds and push out your beautiful, clear ice cubes. You’ll notice that the cloudy impurities are concentrated in the bottom portion of the ice block.
- Separating Cubes: If you made a large block of clear ice within the mold (or if some cubes fused), you can use a serrated knife or a small saw to carefully break apart the ice into individual cubes.
- Storage: Store your clear ice cubes in freezer bags or airtight containers in your freezer.
Why This Works: The cooler acts as an insulator. The sides and bottom of the cooler prevent heat from escaping into the freezer’s cold air. This forces the water to freeze from the top down, effectively pushing the air and impurities to the bottom of the block.
Method 2: Double Boiling and Slow Freezing
This method tackles the issue of dissolved gases head-on. Double boiling removes dissolved gases from the water before freezing, which significantly reduces cloudiness.
What You’ll Need:
- Two pots for double boiling.
- Tap water or filtered water.
- Your chosen ice cube molds.
- A freezer.
The Process:
- Double Boil the Water:
- Fill the larger pot with water and bring it to a rolling boil.
- Once boiling, carefully pour this hot water into a smaller, heatproof container or the second pot.
- Bring the water in the second pot back to a boil.
- Repeat this process 2-3 times. Each boil drives out more dissolved gases from the water.
- Cool the Water: Allow the double boiled water to cool completely to room temperature. Do not pour hot water directly into your molds, as this can damage them and lead to uneven freezing.
- Fill Molds: Pour the cooled, double boiled water into your ice cube molds.
- Slow Freezing: Place the filled molds in your freezer. For best results with this method, try to ensure the water freezes as slowly as possible. This might mean placing them on a shelf that isn’t directly against the freezer’s fan, or even placing a small piece of cardboard underneath the molds to slightly insulate them.
- Freezing Time: Allow the water to freeze completely, which can take 6-12 hours depending on your freezer and mold size.
- Extraction: Once frozen, remove the ice cubes from their molds. You should notice a significant reduction in cloudiness compared to simply freezing tap water.
Why This Works: By double boiling, you are removing dissolved gases that would otherwise become trapped as bubbles, causing cloudiness. The slow freezing process further aids in preventing the formation of new bubbles and allows any remaining impurities to settle.
Method 3: The Insulated Ice Mold Approach
Some commercially available ice molds are designed specifically to promote directional freezing through insulation. These often feature a unique design that encourages freezing from one direction.
What You’ll Need:
- An insulated ice mold designed for clear ice (these are often sold online).
- Tap water or filtered water.
- A freezer.
The Process:
- Fill the Mold: Follow the manufacturer’s instructions for filling your insulated ice mold. Typically, you’ll fill a reservoir with water, and the mold itself will have an opening where the clear ice forms.
- Place in Freezer: Place the filled mold in your freezer according to the instructions.
- Freezing Time: The freezing time will vary depending on the specific mold design but is usually similar to the cooler method (24-36 hours).
- Extraction: Remove the mold from the freezer. You’ll typically find a block of clear ice at the top, with a section of cloudy ice or unfrozen water at the bottom.
- Separate: Carefully separate the clear ice from the cloudy portion, often by simply lifting the clear ice out or breaking it at a designated line.
Why This Works: These molds are engineered with built-in insulation that mimics the cooler method, forcing the water to freeze in a single direction.
Preventing Cloudy Ice: Additional Tips and Tricks
Beyond the core methods, several other practices can help you achieve flawless clear ice cubes.
Water Quality Matters
- Filtered Water: Using filtered water can significantly improve clarity. A good pitcher filter can remove many of the minerals and dissolved solids that contribute to cloudy ice.
- Distilled Water: For the absolute clearest ice, distilled water is an option, as it’s stripped of most impurities. However, some argue it can result in a slightly less “pure” tasting ice due to the lack of minerals.
How to Remove Air Bubbles from Ice
While directional freezing is the primary way to remove air bubbles from ice, other techniques can help:
- Pre-chilling Water: Letting water sit at room temperature for a while before freezing can allow some dissolved gases to dissipate.
- Boiling: As mentioned in Method 2, boiling is highly effective for removing dissolved gases.
Freezing Water Slowly: The Pace of Perfection
The mantra for clear ice is freezing water slowly. Avoid placing your ice molds in the coldest part of your freezer, as this will lead to rapid freezing and more trapped air. A slightly warmer shelf can be beneficial.
Mold Material and Shape
- Silicone Molds: These are generally the best choice due to their flexibility, making it easy to pop out the ice.
- Larger Molds: Larger molds tend to produce clearer ice than smaller ones, as they allow for more efficient directional freezing.
The Importance of an Insulated Ice Mold (or DIY Alternative)
An insulated ice mold (or a DIY setup like the cooler method) is essential for controlling the freezing process. It creates a temperature gradient that drives directional freezing.
Troubleshooting Common Issues
Even with the best techniques, you might encounter a few snags.
My Ice Still Has Some Cloudiness
- Freezing Time: You might not have allowed enough time for the directional freezing to fully work. Try extending the freezing time by a few hours.
- Cooler Size: If you’re using a cooler, ensure it’s not too large, which can lead to uneven freezing.
- Water Impurities: Some tap water has higher mineral content. Consider using filtered water or trying the double boiling method.
How Do I Remove Air Bubbles from Ice (if they persist)?
If you have a few persistent bubbles, you can try to “polish” your ice. This involves gently melting the cloudy exterior of the ice cube with warm water or a cloth. This is more of a cosmetic fix for individual cubes.
My Ice Cracks or Breaks Easily
- Rapid Temperature Change: Avoid placing warm molds directly into a very cold freezer. Let them sit at room temperature for a few minutes first.
- Freezer Temperature: Ensure your freezer isn’t set too low, which can make ice brittle.
Comparing Methods: Which is Best for You?
| Method | Clarity Level Achieved | Ease of Use | Time Commitment | Equipment Needed | Best For |
|---|---|---|---|---|---|
| Cooler Method | Excellent | High | 24-36 hours | Insulated cooler, ice molds | Those wanting consistently clear, large cubes with minimal fuss. |
| Double Boiling | Very Good | Moderate | 24-36 hours + boiling time | Two pots, ice molds | Those prioritizing gas removal and willing to do an extra step. |
| Insulated Ice Mold | Excellent | High | 24-36 hours | Specialized insulated mold | Those who prefer a dedicated, purpose-built tool. |
| Simple Slow Freezing | Fair to Good | High | 12-24 hours | Ice molds | Beginners looking for a slight improvement over standard ice. |
Frequently Asked Questions About Clear Ice
Q1: Can I use distilled water for clear ice?
A1: Yes, distilled water can help create clearer ice as it has fewer impurities. However, some find the taste less desirable due to the absence of minerals.
Q2: How long does it take to make clear ice?
A2: Most methods require a freezing time of 24-36 hours to allow for proper directional freezing.
Q3: Do I need a special freezer for clear ice?
A3: No, a standard home freezer is sufficient. The key is the method you use to control the freezing process.
Q4: What if my clear ice is still a little cloudy?
A4: Ensure you are using enough insulation (cooler or insulated mold), check that the freezing time is adequate, and consider using filtered water or the double boiling method.
Q5: Is clear ice better than cloudy ice?
A5: Clear ice melts more slowly and uniformly, meaning it dilutes your drink less. This is why it’s preferred by bartenders and cocktail enthusiasts.
By applying these principles of directional freezing and understanding the role of impurities in ice and air bubbles, you can transform your freezer into a crystal-clear ice factory. Enjoy your perfectly crafted cocktails and beverages!